This walkthrough is for Google Workspace, the paid business version of Google accounts. Additionally, you will need to upgrade to the Enterprise Plus plan in order to use S/MIME. You can subscribe to Google Workspace for personal use if you wish to do so.
Backstory
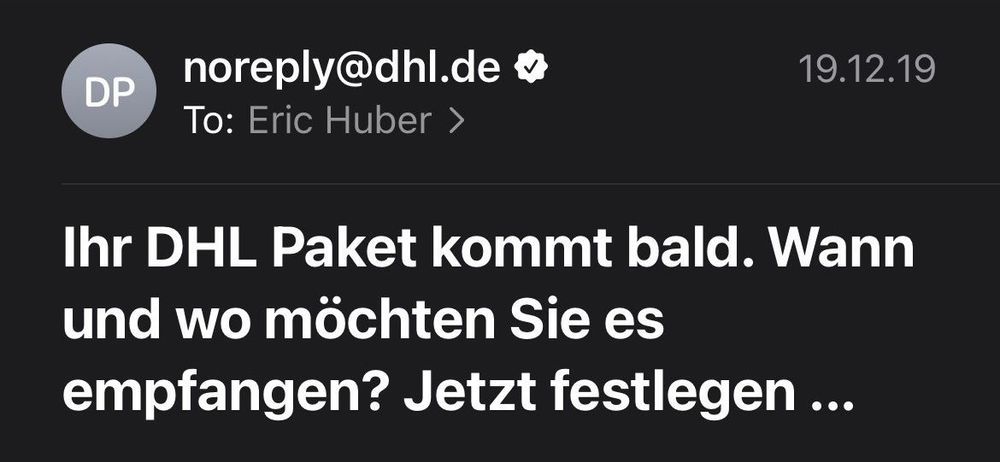
In December of 2019, DHL, the logistics group from Germany, notified me via email about an upcoming parcel delivery. I was using Apple's Mail app at the time, which was displaying a "Twitter verified"-like check mark next to the sender's email address:
What does the check mark mean?
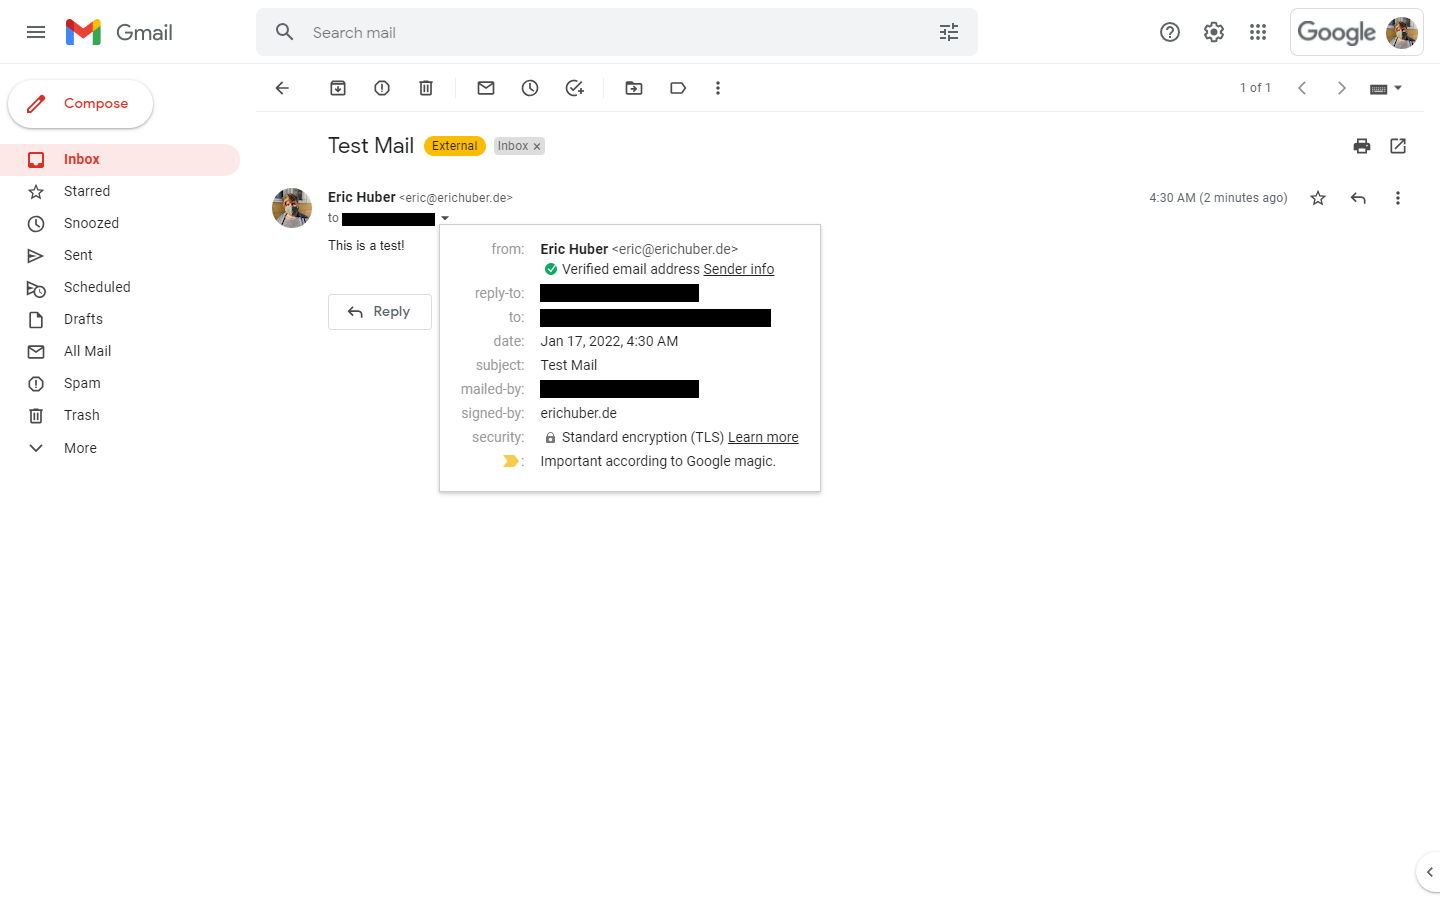
Upon further inspection, I discovered that Gmail also labels this email with a check mark and even provides additional information:
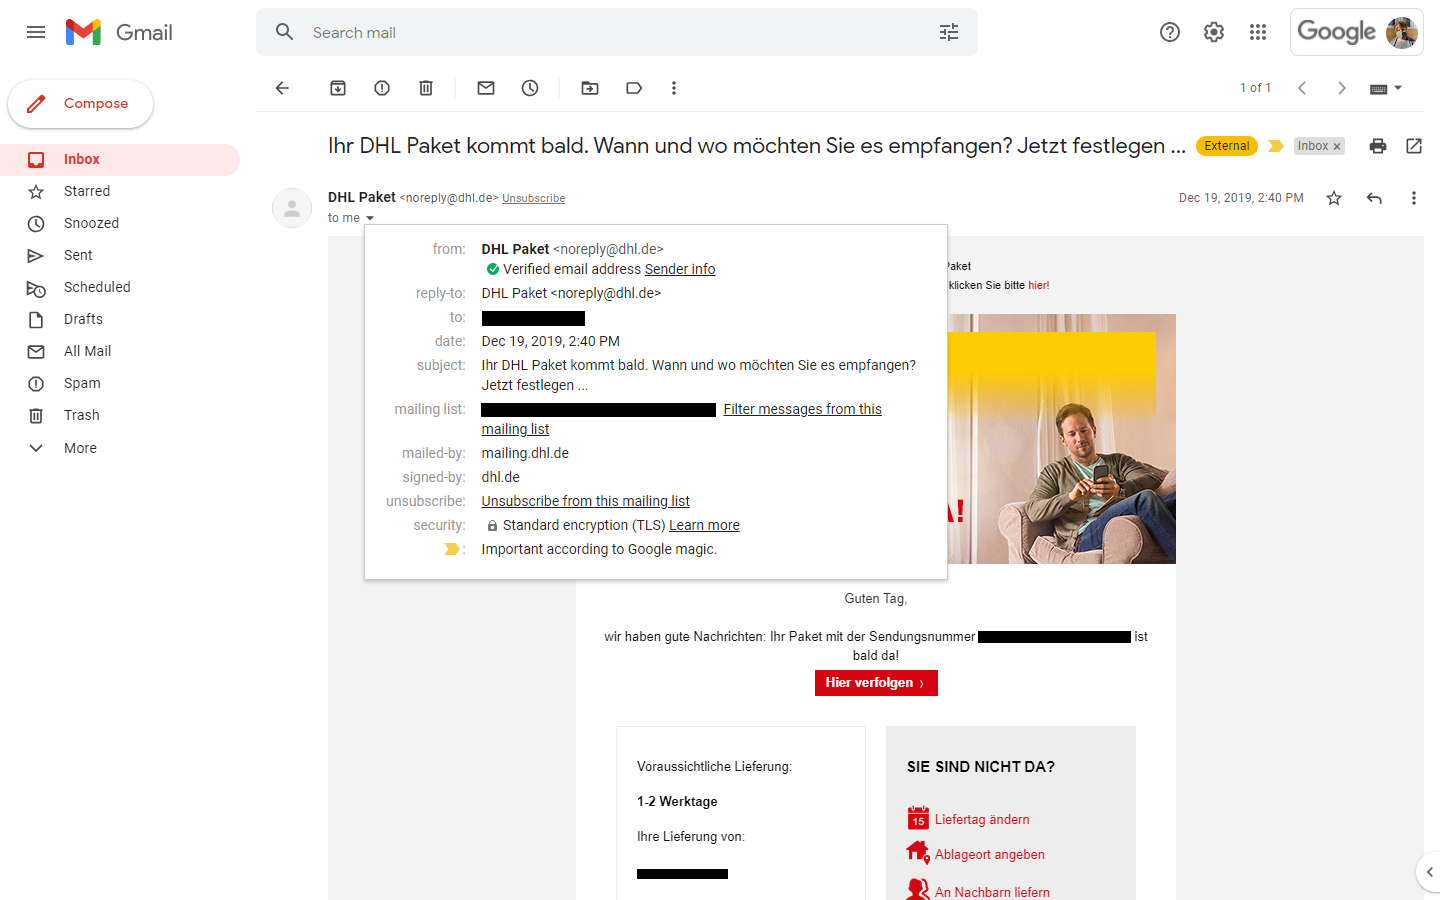
Once again we find a check mark, this time in green, alongside the label "Verified email address."
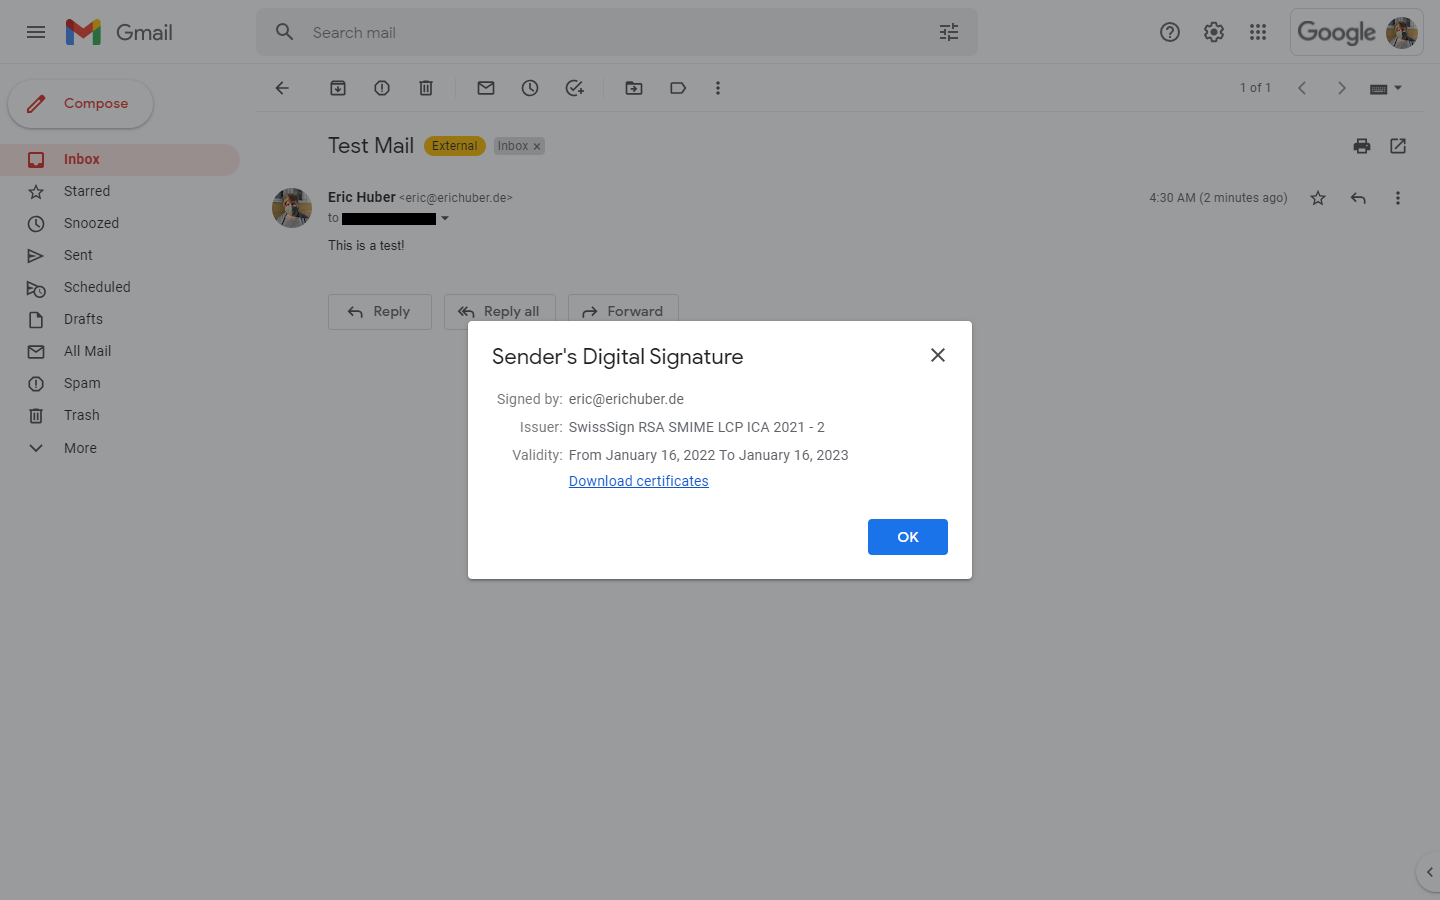
We are presented with even more information upon clicking "Sender info":
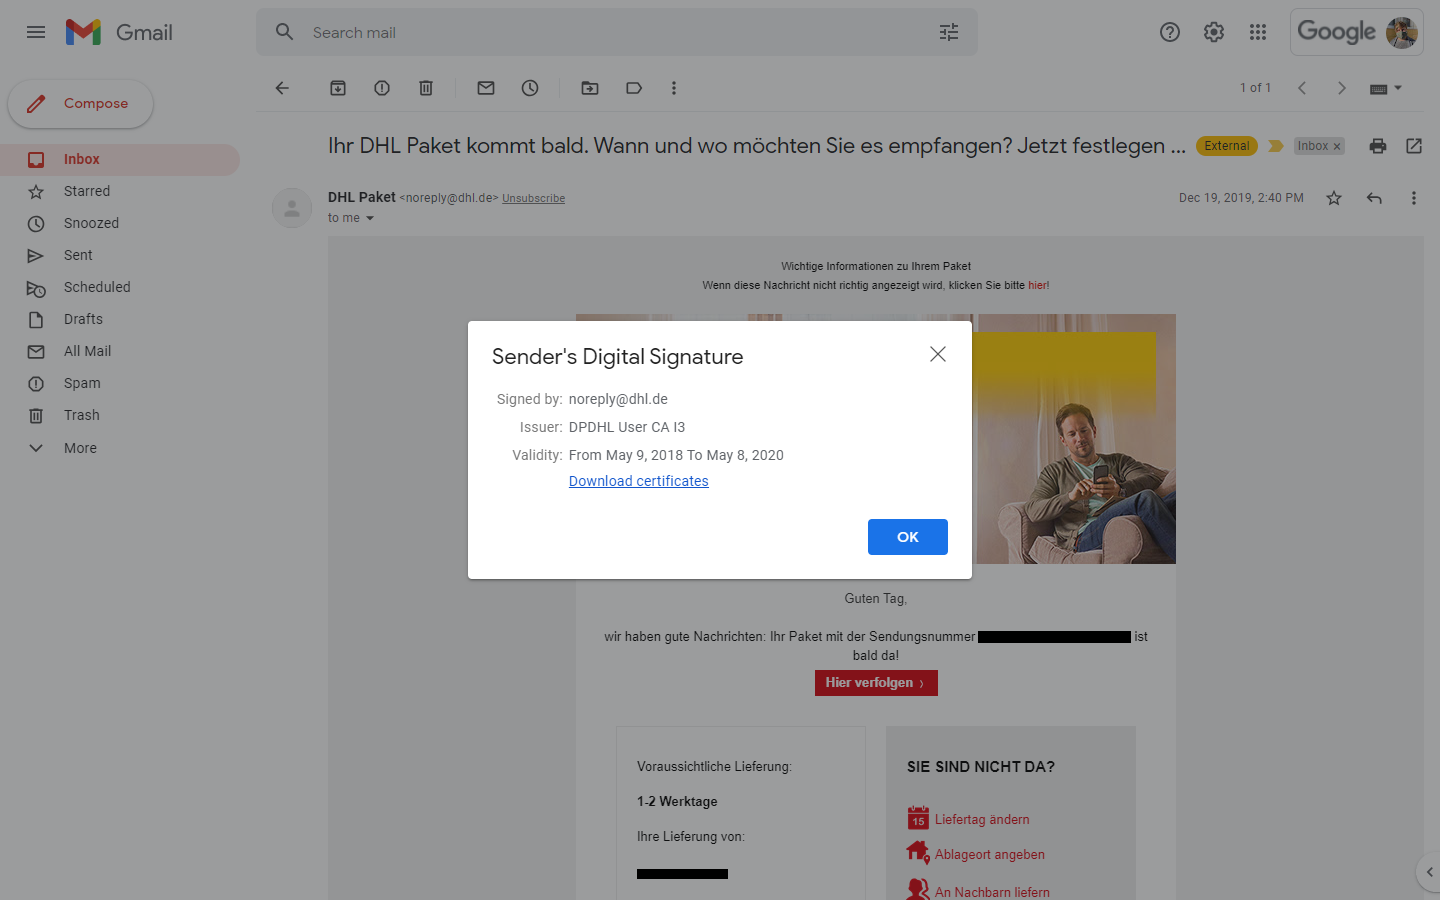
The keywords here are "Download certificates," which saves a certificates.pem file to your computer. When you connect the dots you will find that this must be a S/MIME certificate that is used to encrypt & decrypt emails between recipients.
What's in the certificate?
Thanks to OpenSSL, we can have a closer look at the contents of this certificate via openssl x509 -in certificates.pem -noout -text:
Certificate:
    Data:
        Version: 3 (0x2)
        Serial Number:
            39:00:09:de:ea:77:d1:96:18:ba:14:97:23:00:05:00:09:de:ea
        Signature Algorithm: sha256WithRSAEncryption
        Issuer: C = DE, ST = Nordrhein-Westfalen, L = Bonn, O = Deutsche Post, CN = DPDHL User CA I3
        Validity
            Not Before: May  9 08:23:06 2018 GMT
            Not After : May  8 08:23:06 2020 GMT
        Subject: DC = com, DC = dhl, CN = "noreply, DHL, BN", emailAddress = [email protected]
        Subject Public Key Info:
            Public Key Algorithm: rsaEncryption
                RSA Public-Key: (2048 bit)
                Modulus:
                    00:90:40:00:16:07:45:6b:d1:34:bf:c0:0a:30:6b:
                    2a:e0:60:73:1f:39:65:af:25:8a:df:01:63:05:95:
                    a5:a5:00:11:fb:1e:03:85:f0:b2:aa:2e:61:ed:db:
                    e6:fb:7f:cb:77:51:22:1c:8d:61:10:22:f8:98:cd:
                    8c:ad:fe:30:a2:c3:ef:70:d0:65:07:ec:90:13:60:
                    0b:14:9c:4b:cf:2d:17:54:94:dd:3a:dd:da:f4:c6:
                    9f:94:1f:83:4a:dd:da:8b:fe:25:ad:39:bc:b6:76:
                    19:45:80:f4:84:69:1a:ef:0c:3a:db:ff:00:5c:ec:
                    8b:51:9e:1f:25:de:63:b9:dd:52:c3:f6:fc:6b:a1:
                    e2:d3:f2:8f:b2:24:10:9f:0c:0e:20:fa:d6:34:d1:
                    f7:94:eb:68:83:28:77:79:c3:69:0d:ed:1d:f1:2f:
                    64:76:0e:54:86:2b:27:6d:c8:c0:57:d6:25:ba:26:
                    1b:72:4f:38:c2:57:4b:0d:7f:be:d7:c8:ef:74:00:
                    4a:3d:9e:f3:36:73:c4:25:87:ac:87:56:c4:6d:c0:
                    6c:57:ba:a5:8a:d3:da:51:62:74:03:d4:31:d2:2f:
                    8c:94:46:62:fd:4d:6b:fe:f4:f1:a1:3b:b4:4a:8c:
                    89:80:88:74:ab:6d:56:ef:96:d1:8b:8f:f4:8f:ad:
                    03:71
                Exponent: 65537 (0x10001)
        X509v3 extensions:
            1.3.6.1.4.1.311.21.7:
...$.....d..F   0-.%+.....7.....*...........i..7.
            X509v3 Extended Key Usage:
                TLS Web Client Authentication, E-mail Protection
            X509v3 Key Usage:
                Digital Signature, Non Repudiation, Key Encipherment
            X509v3 Certificate Policies:
                Policy: 1.3.6.1.4.1.5064.1.1
                  CPS: http://keyserver.dhl.com/repository

            1.3.6.1.4.1.311.21.10:
                0.0
..+.......0
..+.......
            S/MIME Capabilities:
......0...+....0050...*.H..
..*.H..
            X509v3 Subject Key Identifier:
                8D:F9:14:70:BA:F0:57:4F:E1:EA:CC:4B:D8:C4:44:B3:1F:AA:E4:50
            X509v3 Subject Alternative Name:
                email:[email protected]
            X509v3 Authority Key Identifier:
                keyid:7F:FB:70:72:98:10:C6:C9:1F:84:10:DE:8F:08:A5:67:93:8E:5C:33

            X509v3 CRL Distribution Points:

                Full Name:
                  URI:http://keyserver.dhl.com/pki/i3/dpdhl_user_i3.crl

            Authority Information Access:
                OCSP - URI:http://ocsp-g3.dhl.com
                CA Issuers - URI:http://keyserver.dhl.com/pki/i3/dpdhl_user_i3.crt

    Signature Algorithm: sha256WithRSAEncryption
         2e:f1:dc:83:c0:d9:70:0e:40:1a:3f:f4:f6:5d:83:2a:fc:dd:
         40:5e:8a:d9:eb:97:c1:88:71:52:b1:9c:99:17:52:c6:25:38:
         ba:b8:1f:4b:08:c5:a9:90:b3:9a:a1:ba:0a:59:00:46:f4:48:
         ac:02:1a:0a:e8:de:6b:5e:6f:73:5b:86:09:4a:4a:92:ad:aa:
         12:a6:da:cc:1f:4f:93:0c:0c:ab:0a:d3:c8:28:84:35:a5:3a:
         ab:1d:8a:ae:77:9c:84:ce:db:d4:ca:39:ae:f9:c0:82:61:98:
         b8:0d:29:b7:ab:b8:87:05:a6:24:1f:68:c1:ee:9f:46:d1:12:
         fa:48:d0:36:63:d3:6f:f7:b9:80:54:75:c2:97:1d:c1:6e:22:
         12:ac:aa:0e:53:35:36:ce:1f:a0:84:e1:35:ce:7d:2d:da:dd:
         14:14:40:d8:58:c0:17:88:10:b6:21:e2:ad:fb:54:f9:d0:f9:
         e1:7c:9b:0c:0f:be:1b:3a:2b:45:e3:7d:d1:b3:26:0c:2d:13:
         da:03:25:da:fd:c4:e7:5d:80:93:ac:98:94:a8:dd:c2:48:59:
         69:7d:ea:7b:83:20:23:02:5b:4a:3f:77:d2:b4:fa:fe:22:15:
         89:8b:b7:0f:f2:06:88:e7:50:b9:2b:d6:d8:0b:38:cb:d5:e8:
         e0:a9:2f:09
And we can learn a lot from this data!
For example, this certificate was issued on May 9th, 2018, and expired on May 8th, 2020. It was issued by Deutsche Post in Bonn, Nordrhein-Westfalen, and refers to [email protected] as its subject email, which, unsurprisingly, matches the email address from the parcel notification email.
More importantly, if you bring your attention to the X509v3 extensions, you will find that "E-mail protection" was added as an extended key usage. Additionally, "S/MIME Capabilities" is attached in the extensions.
How do I get ahold of a check mark myself?
Long story short:
- Obtain a S/MIME enabled certificate
- Add your certificate to all of your email clients
- Your email clients will begin to attach your public certificate to every outgoing email
However, I found myself facing a lot of roadblocks throughout this process.
For those who are interested in enabling hosted S/MIME with Google Workspace, keep reading to ensure this process goes smoothly and doesn't consume as much of your time as it did for me.
Hosted S/MIME in Google Workspace
Before you get started, I recommend you read the full post first to make sure you're up for the challenge and financial burden. All steps are listed in chronological order and must be completed in succession.
Upgrade your Google Workspace plan
To get started, you'll need to be an active subscriber of the Enterprise Plus plan as it is the only Google Workspace plan to support S/MIME encryption. This plan will run you about US$30/month/user at the time of writing.
Google Workspace Enterprise Plus
Enable S/MIME encryption in Google Workspace
Once you've upgraded your Google Workspace plan to Enterprise Plus, you're going to have to manually enable S/MIME in Google Admin.
You can do so by navigating to Apps -> Google Workspace -> Settings for Gmail -> User Settings in Google Admin.
You should then be greeted by this screen:
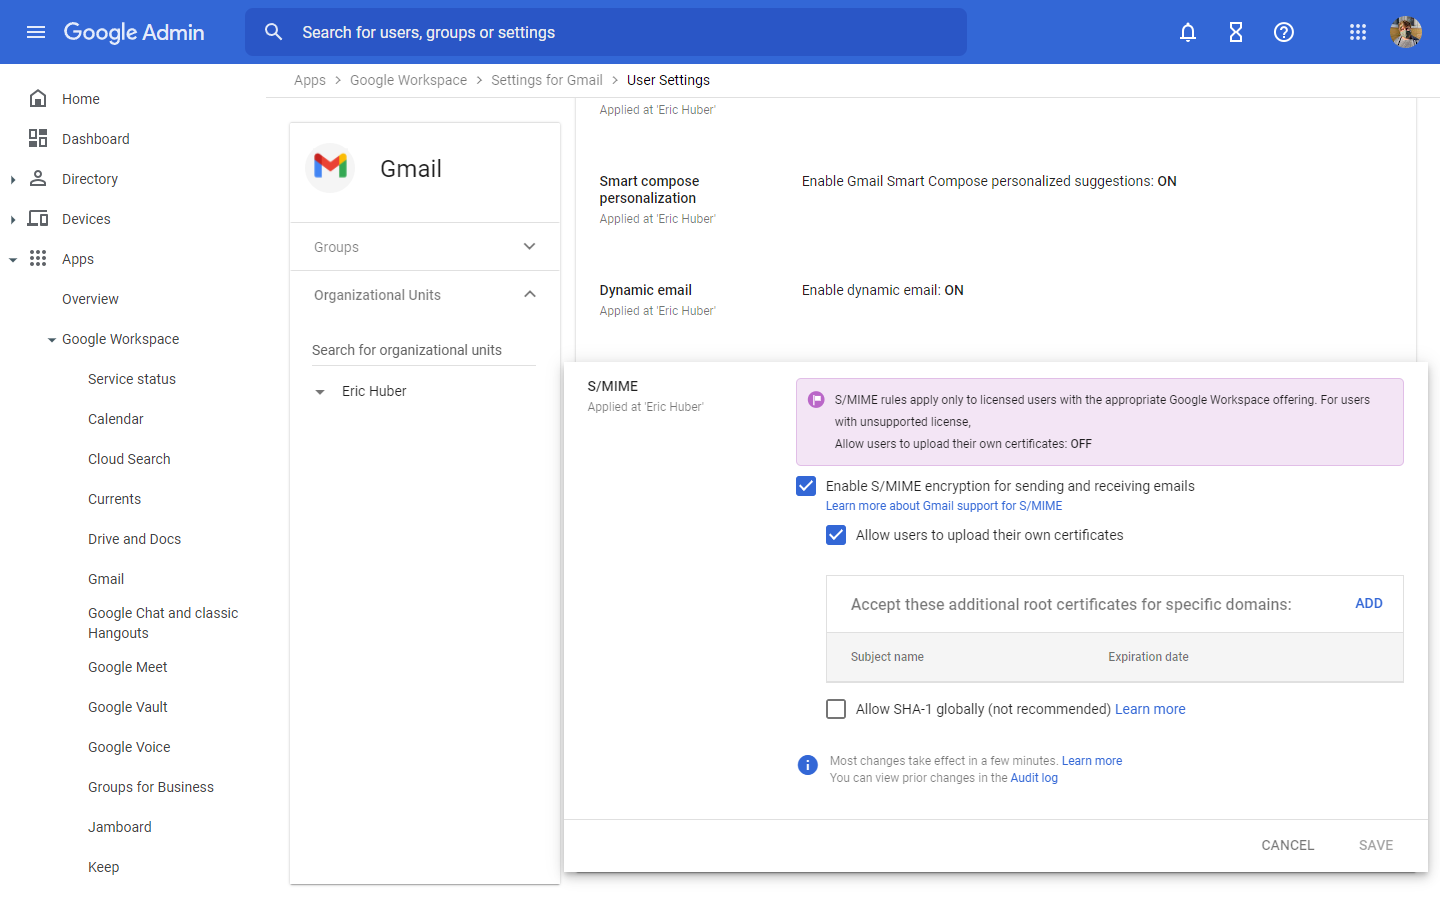
All you'll have to do is tick these two boxes:
- "Enable S/MIME encryption for sending and receiving emails"
- "Allow users to upload their own certificates"
Hit the "Save" button to apply your changes!
Generate a CSR
The first step in your S/MIME journey is going to be generating a Certificate Signing Request. To do this, you'll need an RSA key—you may use an existing key if you already have one.
To generate a brand new RSA key, run this command:
$ openssl genrsa -aes256 -out erichuber.de.key 4096Linux command to generate a new RSA key with 4096 bits
And now you can generate the CSR using your RSA key:
$ openssl req -new -key erichuber.de.key -out erichuber.de.csrLinux command to generate the CSR using your RSA key
You'll be prompted to enter some details about your CSR, but you can leave the fields blank by using a . in the appropriate fields. However, you're going to want to enter your email address in the Email Address prompt. Make sure to use the email address you want to create the S/MIME certificate for!
Finally, you'll be offered to enter a challenge password. You can leave this blank if you like, but I recommend entering a passphrase for extra security.
Your final output should look something like this:

Purchase an S/MIME enabled certificate
Next up is the arguably most important step: purchasing a S/MIME certificate! Google maintains a list of trusted CA certificates that you can use to make your certificate authority decision.
I chose the SwissSign E-Mail ID Silver certificate with a validity of 1 year for 25 CHF, which is about US$27 at the time of writing.
SwissSign E-Mail ID Silver (DV)
We will be using SwissSign for the purposes of this step-by-step guide, but you can use any certificate authority of your choice. Keep in mind that your certificate must not be valid for more than 27 months, otherwise, Google Workspace will reject it.
Shortly after you've been billed by SwissSign you should be able to activate the code for your new S/MIME certificate under My account -> Certificates -> Activate code.
Because you'll be prompted for it later, make sure to copy the 18 characters long "Certificate voucher key" on this page.
Once you've done that, click the "Activate code" button to proceed:

Activate your S/MIME certificate
This process is quite lengthy and can be tedious, so make sure you bring some time to follow the next steps very precisely. Mistakes might be irreversible once the certificate has been issued.
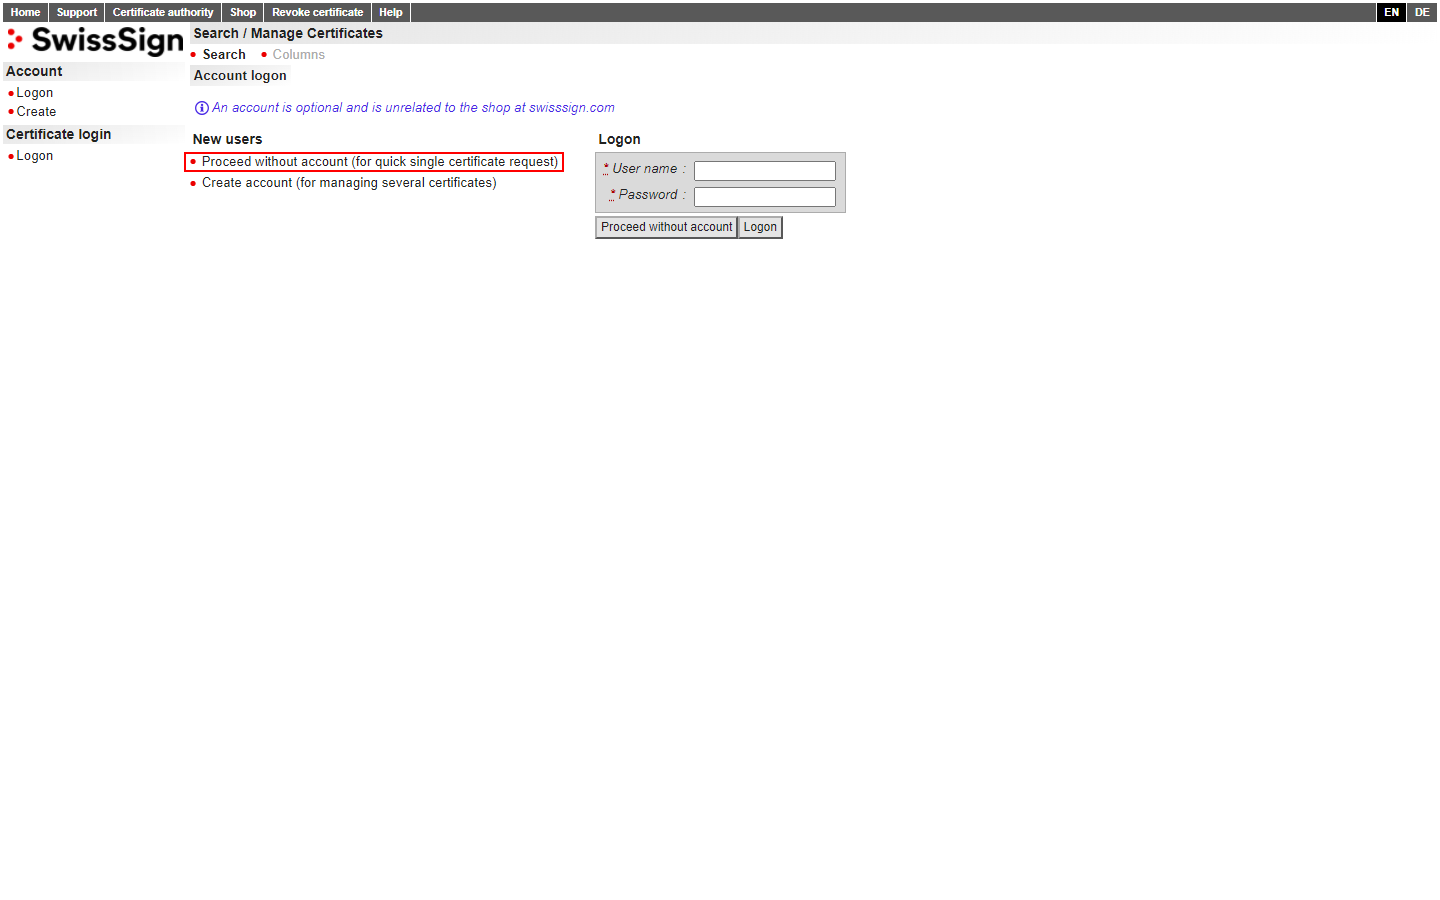
Upon clicking "Activate code", you'll be greeted by a login page. You can ignore this login page entirely and just click the "Proceed without account (for quick single certificate request)" button on the left-hand side.
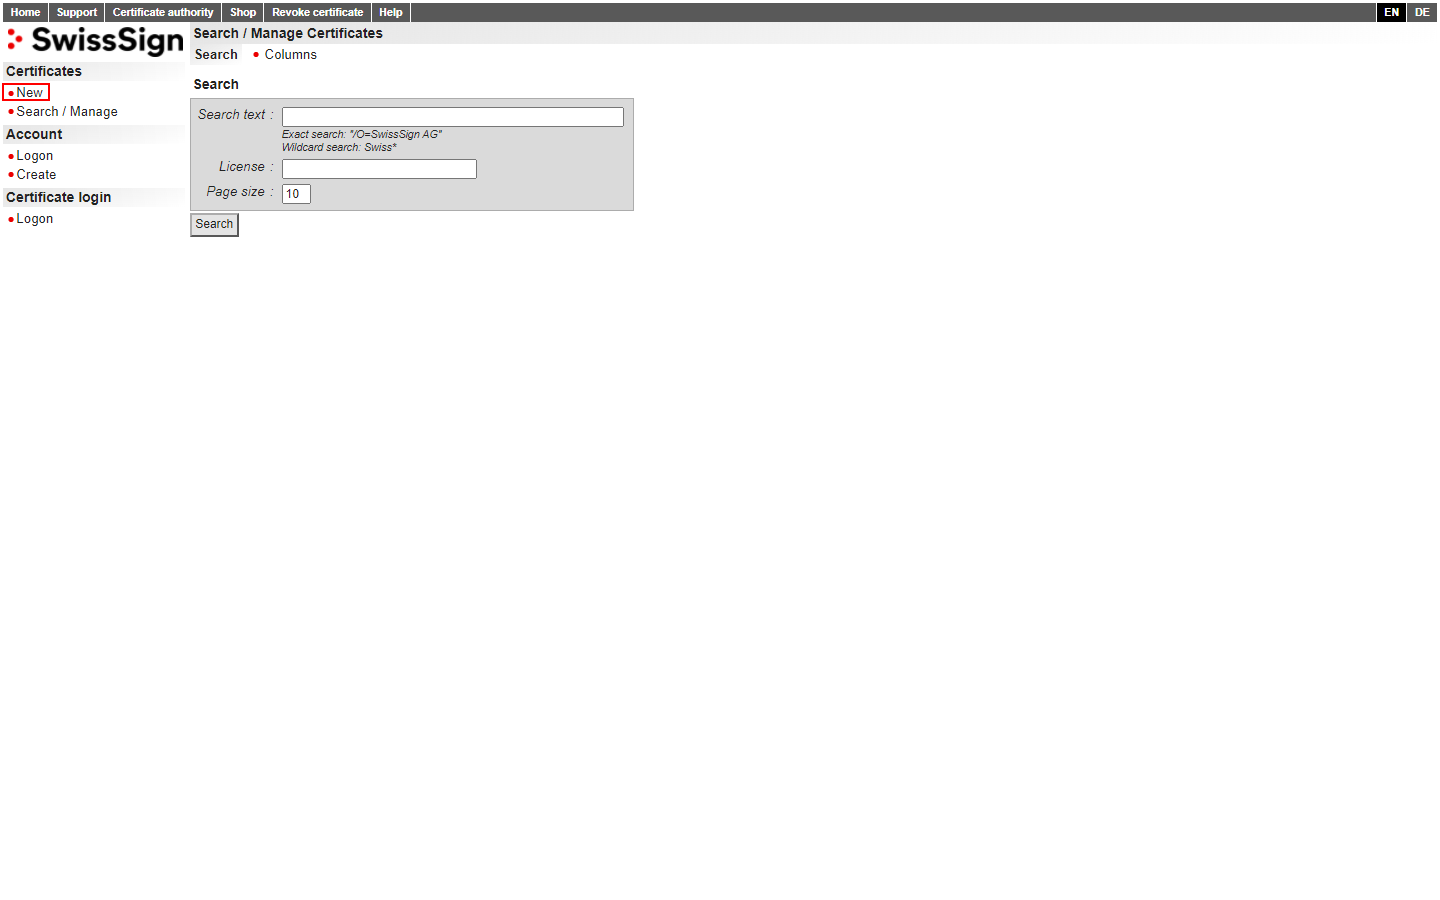
You'll be redirected to a search page. You can ignore this as well and just click the "New" button on the right-hand side.
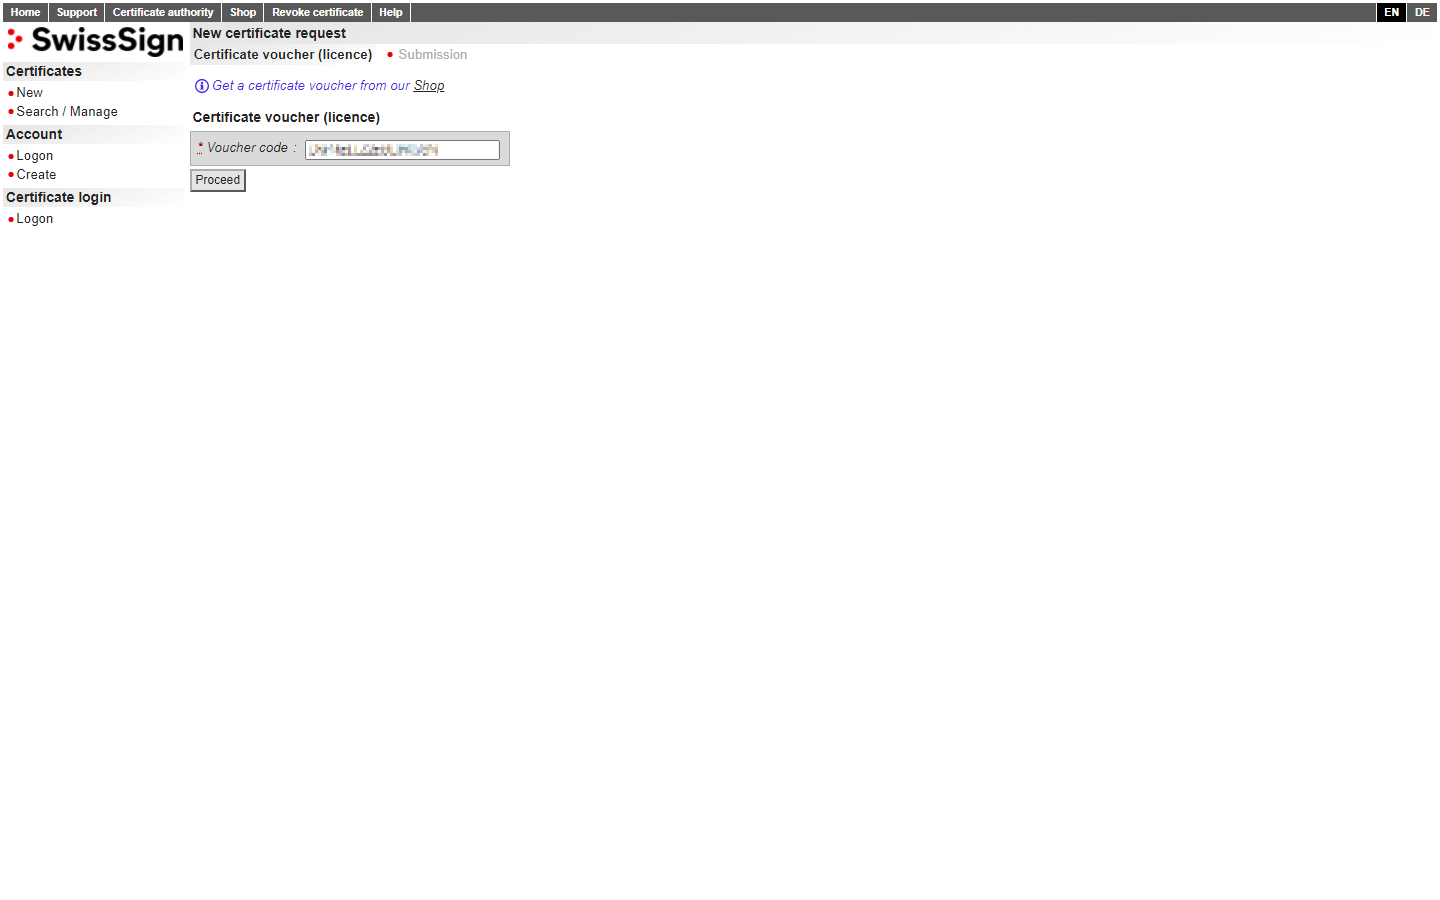
Now you're on the right track.
On this "Certificate voucher" page, you'll have to paste the 18 characters long "Certificate voucher key" you previously copied from the SwissSign website with the red "Activate code" button.
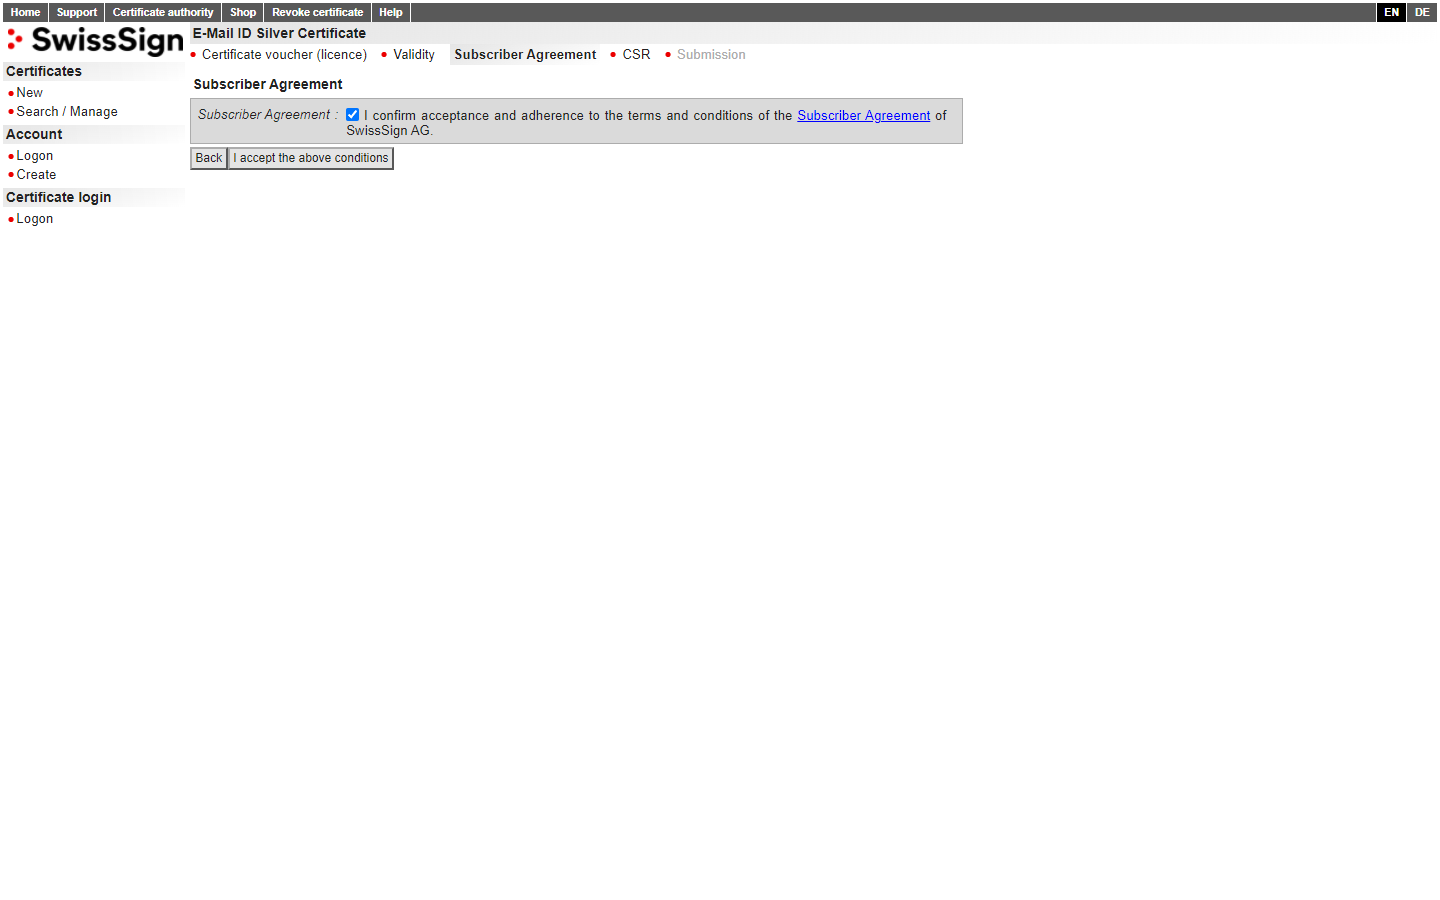
You'll be asked to accept the "Subscriber Agreement" which I recommend you review before clicking the checkbox.
Once you're ready you may proceed by clicking the "I accept the above conditions" button.
It's time to paste the CSR you generated earlier. To do that, open the CSR file in a text editor of your choice, or print it with cat:
$ cat erichuber.de.csrLinux command to print your CSR to the console
Your CSR will look something like this:
-----BEGIN CERTIFICATE REQUEST-----
MIICZDCCAUwCAQAwHzEdMBsGA1UEAwwUam9obi5kb2VAZXhhbXBsZS5jb20wggEi
MA0GCSqGSIb3DQEBAQUAA4IBDwAwggEKAoIBAQC92m900OghVPFt1nfAiHht+jDq
D336LsjLs4SyrJTNgfTG6hIuTwRxfNfbCcL1NlEtncX8VCEyp+A79Ak7e8x956Jg
HbY+3hQbW0AkgMdxBw26XseD14P94RilIe5JfyEQHecZDu1Z7uBqM64rS3xvlfEA
fFhKrsT8NHQPvoEHow9sNeA0KedpB+Jtdo4N2Xg54NQL5z8ei62bFJBp8pimoG/a
vou5t27u1bh+Z2bNwaOGPcdWvawOHsvYJO1i1ITPPmckvQSxI0OLj/YP63cB7fa4
bcaAo9TMUqAYIp8p6S2tA8IUr1w5wCiycsQrNZ15fGYKjMPd+wLrpy5XJVrRAgMB
AAGgADANBgkqhkiG9w0BAQsFAAOCAQEAFKdpNKyylzu3jir3xDFZL/Oespe1nbA5
TJcU7uVW0NwxCkEqVtpOtJnyc8MLQ+3pq1yT+2VtgbjP8GxOoD7nUqLzEuaIkdNL
eU0mFwrcrGgwgSJm6uLUElWSoltOe8rPNBl9QfkD7NGBFWeB1AibMBs47OeGWzEG
a8IItMY3UKRyJizakm3bhnxE4yBzsTMD2EPXIWJYLALLH+5Sw0q+UTLiwl4j7oB9
uJjoAzrvgESISjGbS/PR8LVEr3cjTS6JKHeCeW7iEI8SfBTbFvWGmA8pXjzNZLav
jragdN2GS9HagPASzW6rdvWzb65Rng7GztoAZuiIC0hd45yzrvJnpg==
-----END CERTIFICATE REQUEST-----
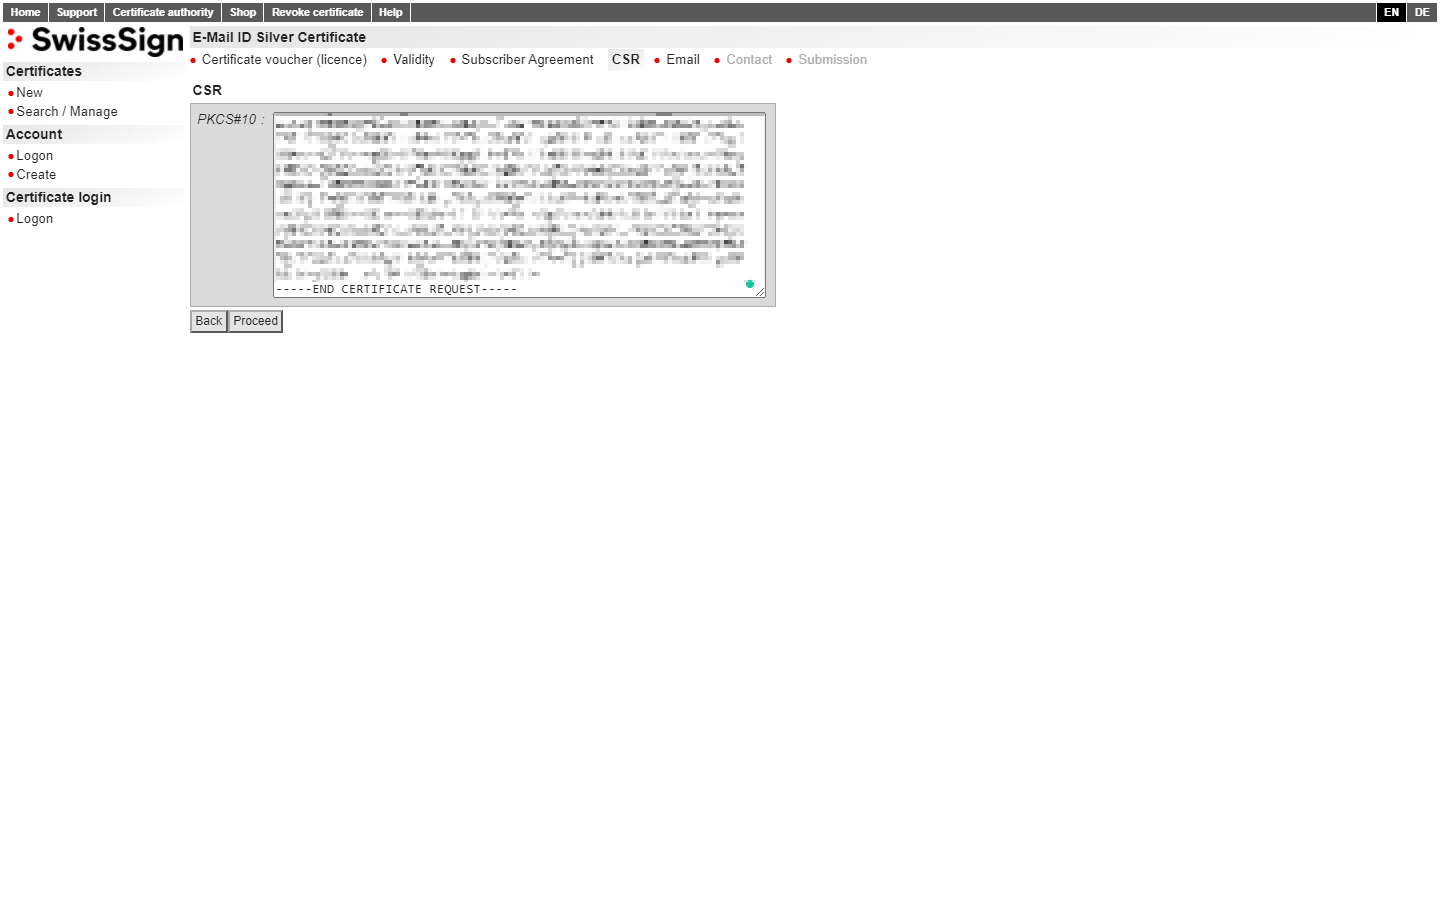
Paste your CSR into the PKCS#10 field and click "Proceed" to continue.
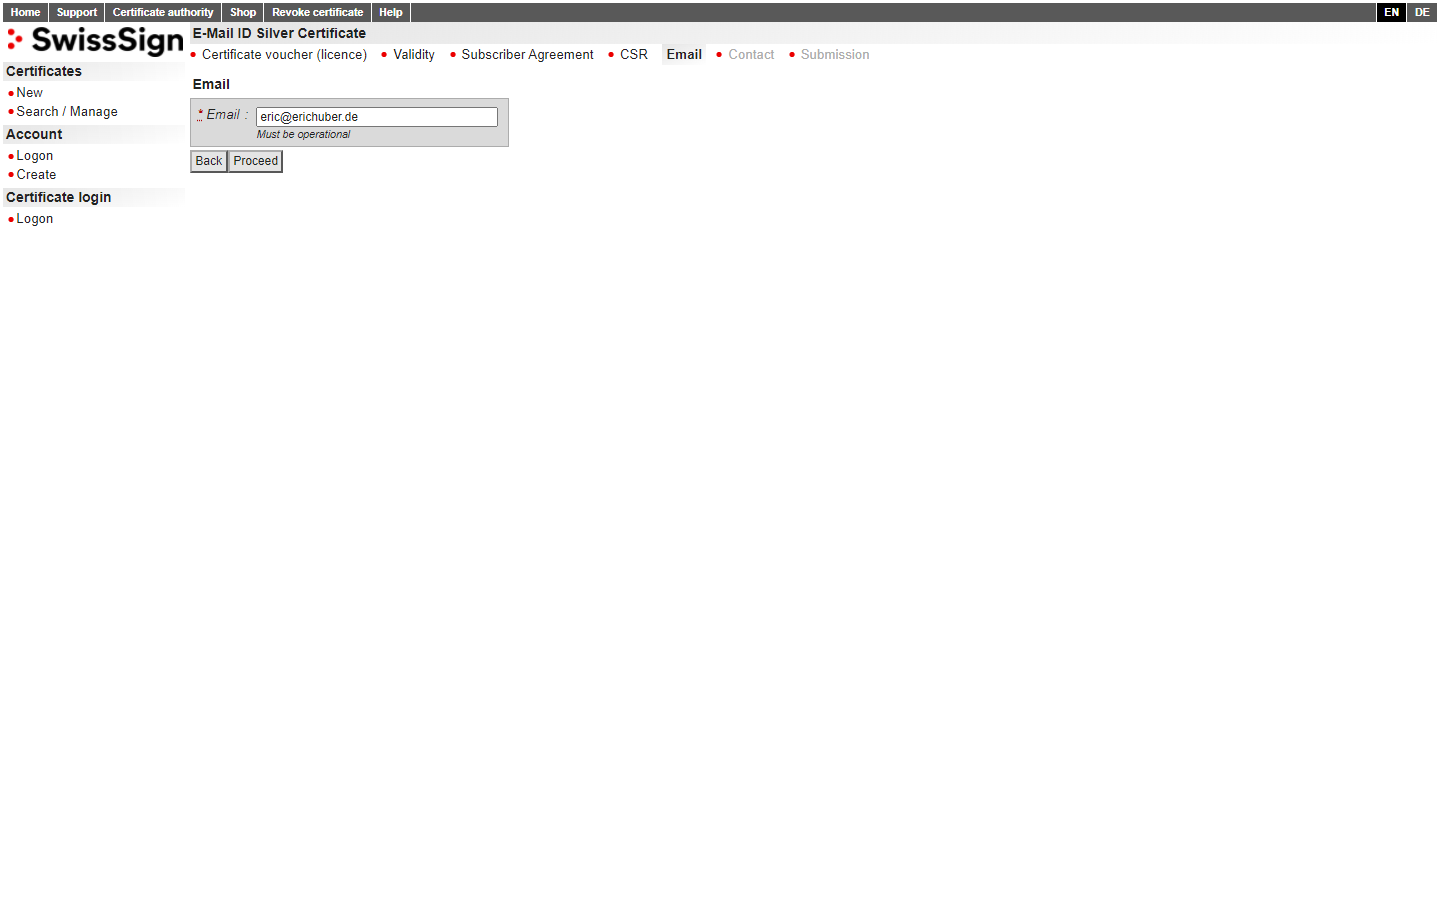
SwissSign now needs to know the email address to which the S/MIME certificate should be registered. You're going to want to enter your email address here—make sure to double-check your input!
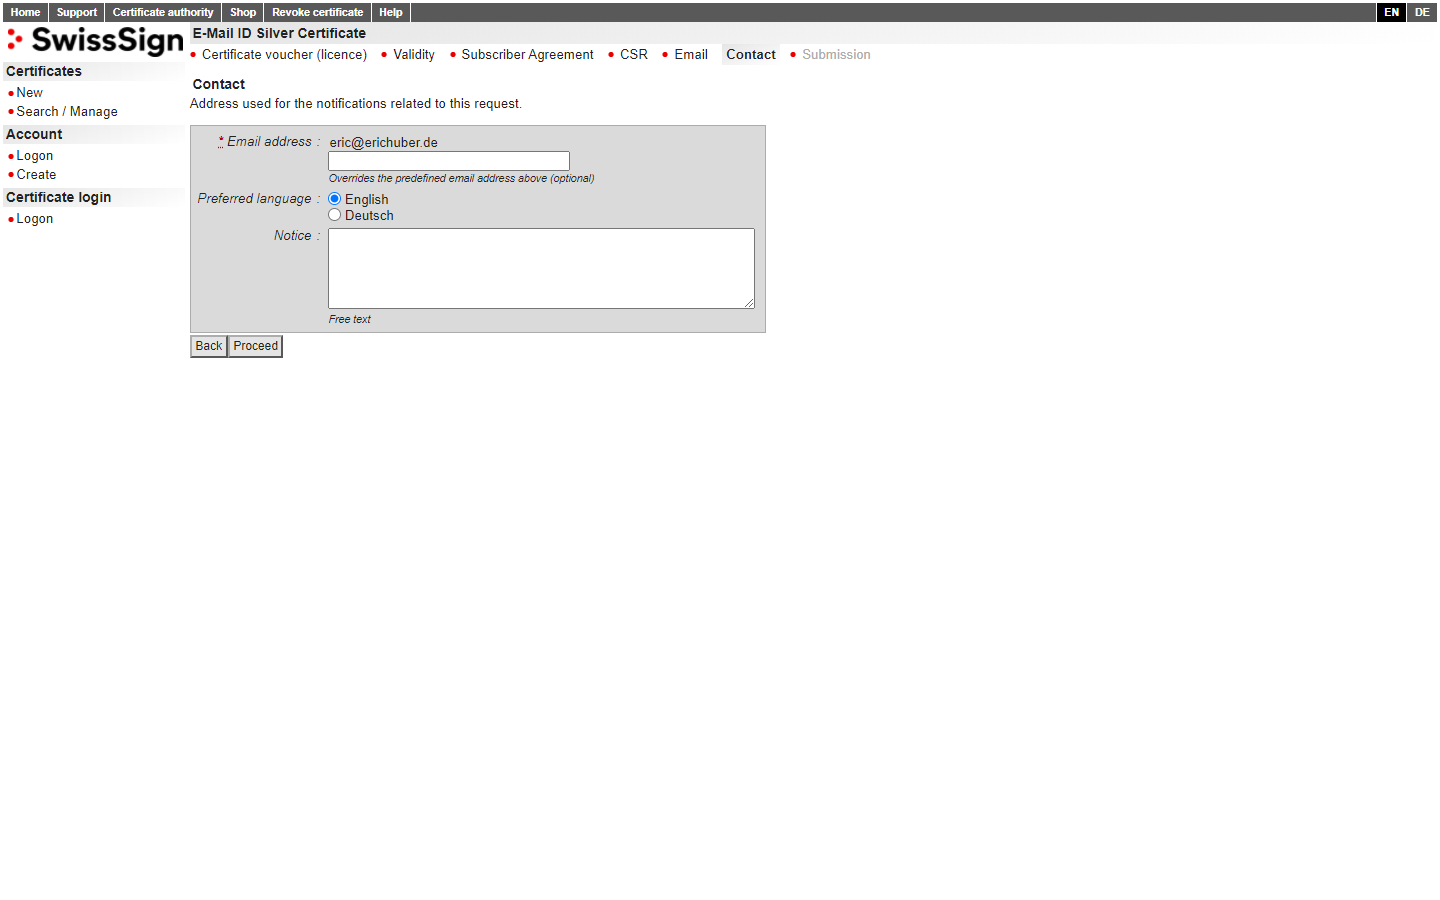
This next step is intended for larger organizations where e.g. an IT department would issue a S/MIME certificate on behalf of someone else. Since you're issuing the S/MIME certificate for yourself you may leave all of these fields as they are and click "Proceed".
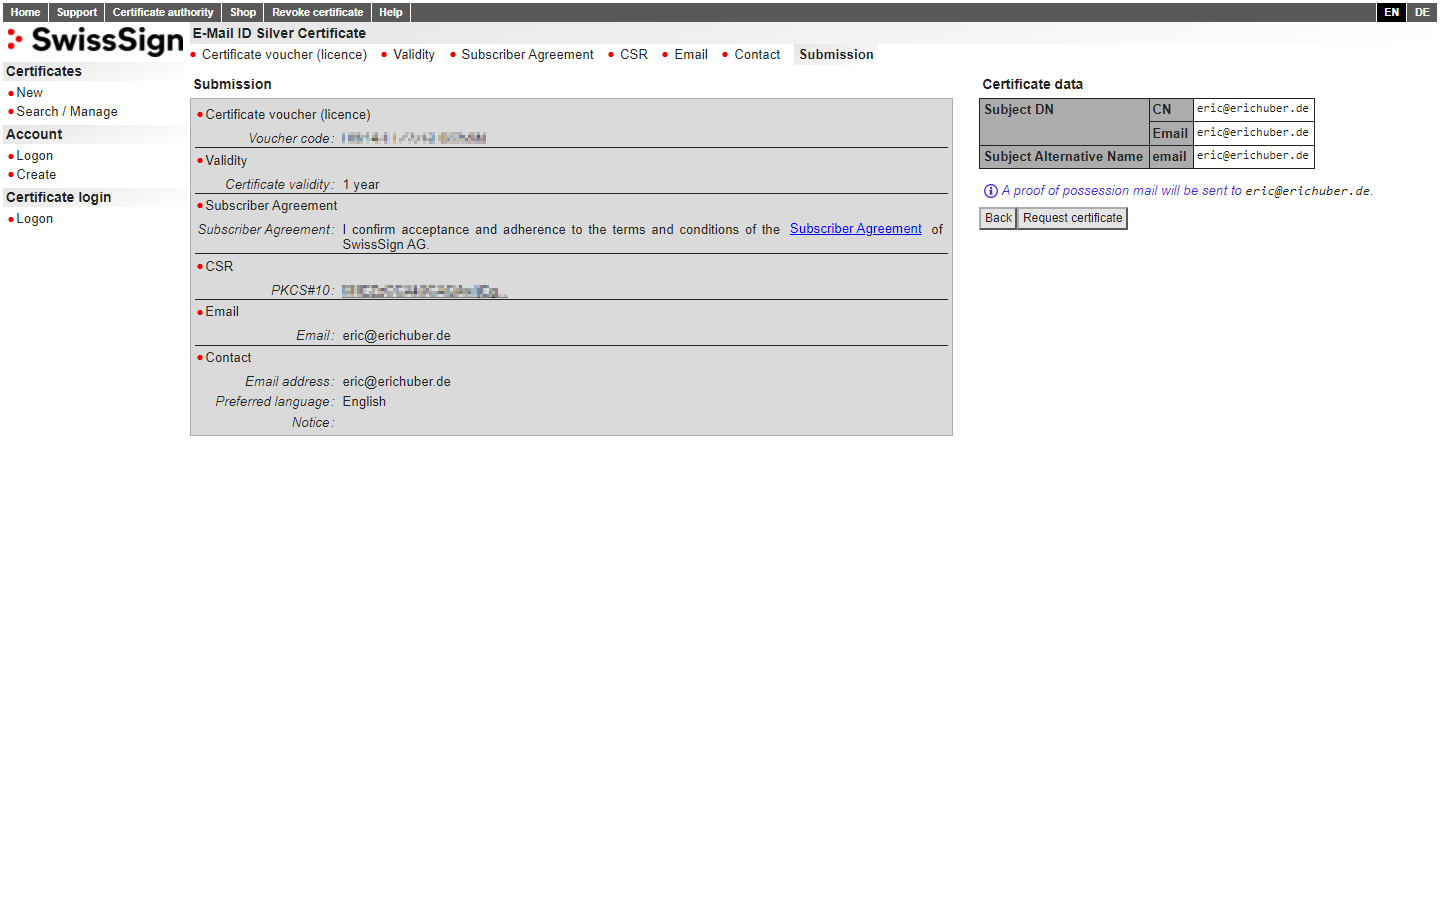
To wrap up the initial activation phase, you're presented with a final "Submission" page to make sure you entered all details correctly. Take a good minute to review all the entries. Use the "Back" button if you have to make any adjustments.
Once you're ready, hit the "Request certificate" button on the right-hand side.
Check your inbox! 📫
You should have received an email from SwissSign. Click the underlined "approve" link in the email to proceed. This step is necessary to verify that you are the owner of the email address to which the S/MIME certificate will be registered.
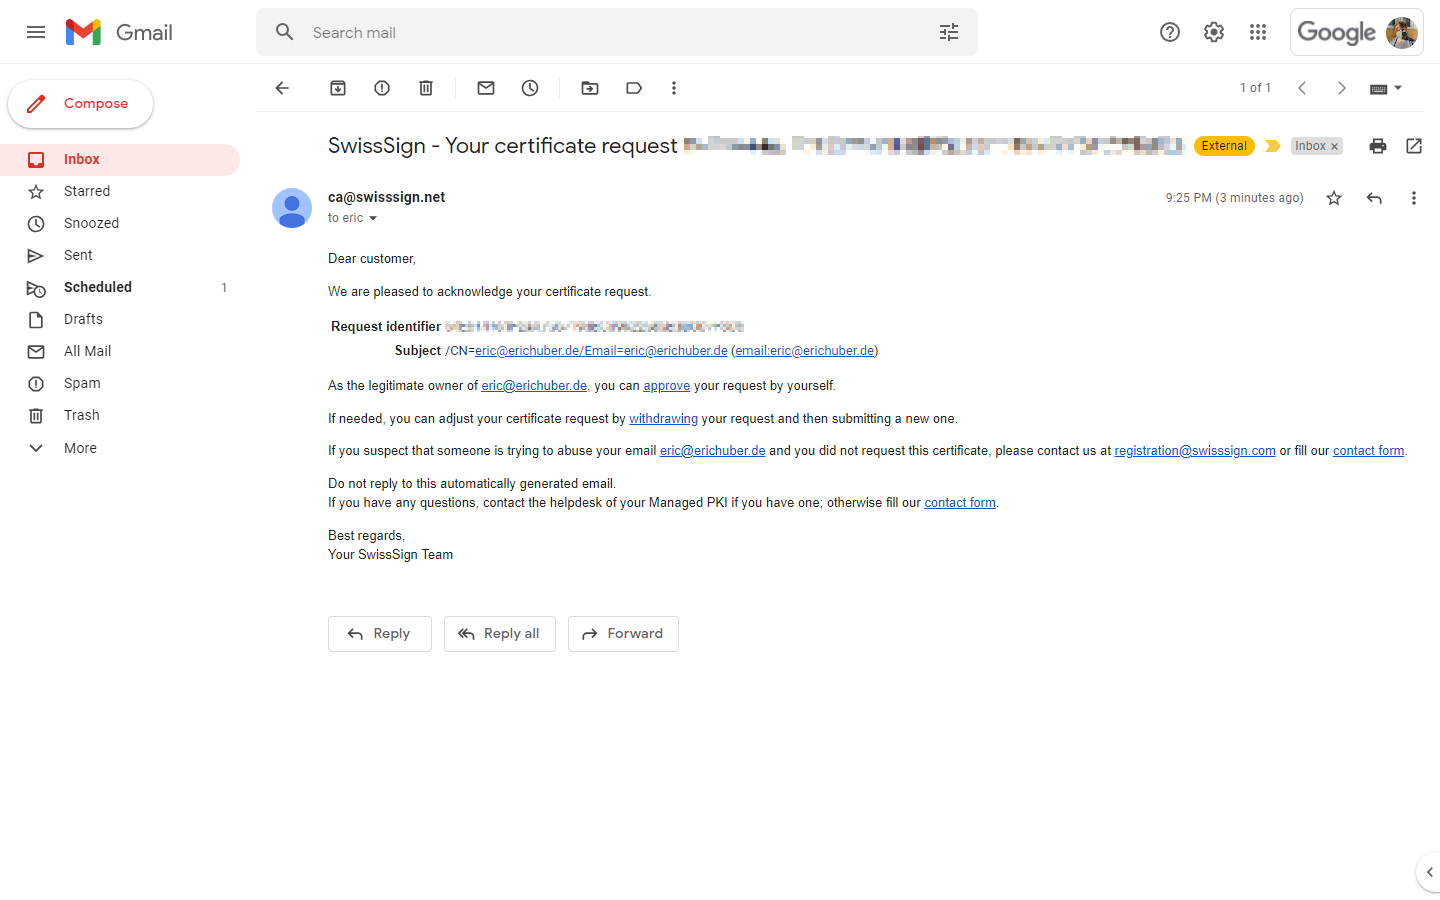
The link will redirect you back to SwissSign where you'll be given a last glance at what your certificate will look like. I recommend that you once again review the information. If there are any issues with the entries you can use the "withdrawing" link in the email to withdraw the certificate request and start anew.
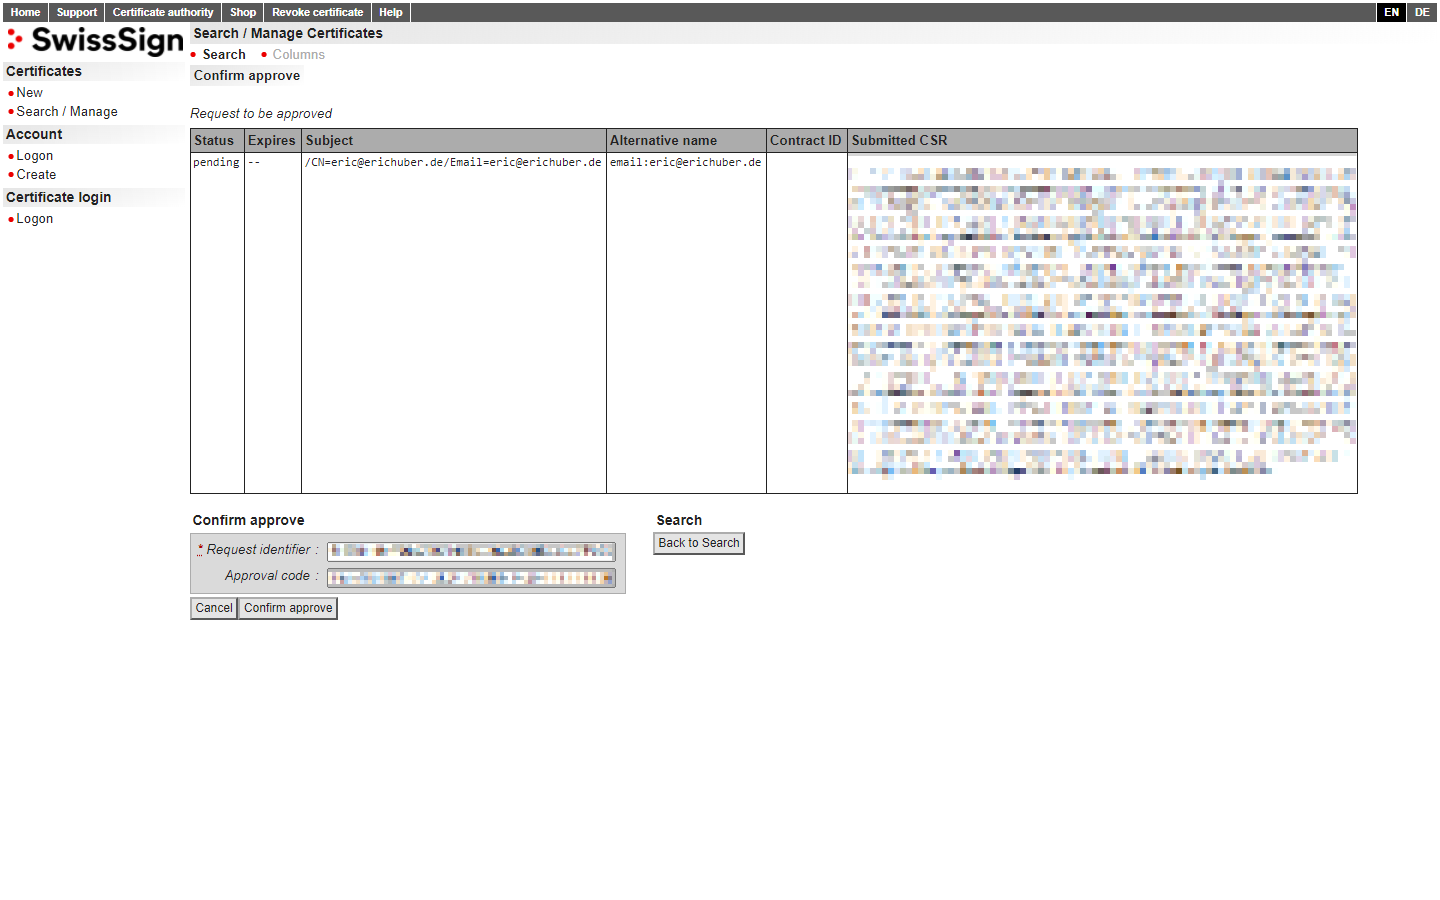
Click "Confirm approve" to continue.
Back to your inbox! 📫
You should have received a new email from SwissSign confirming that your certificate request has been approved. In the email, you'll also find a "Download certificate" link which you can go ahead and click to retrieve your certificate files.
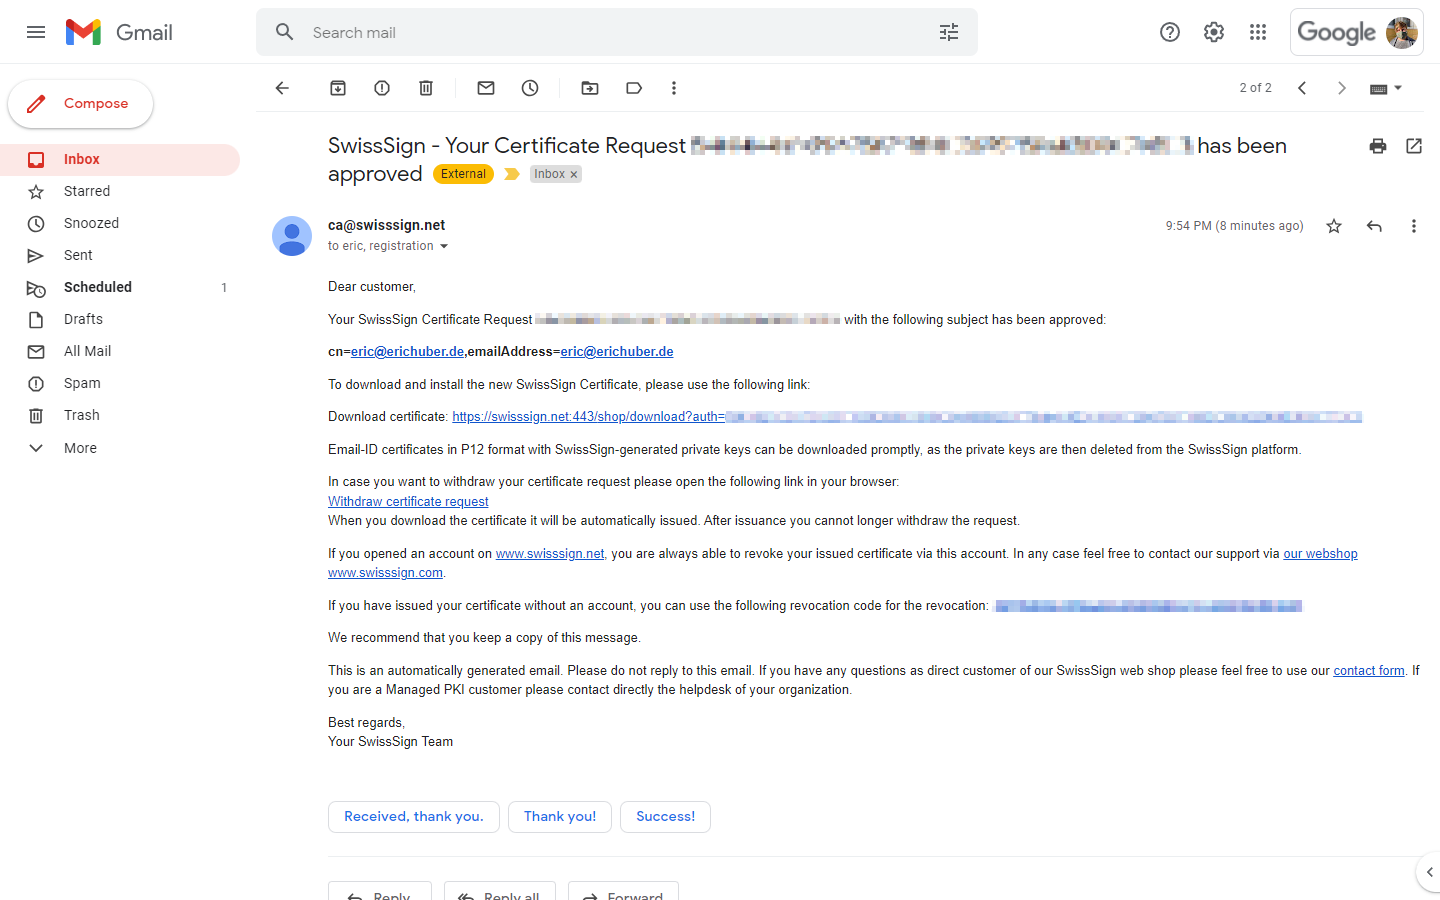
Towards the bottom of the SwissSign email, you'll find a revocation link that can be used if your S/MIME certificate gets in the wrong hands.
On the download page, you'll be offered several format options. You will need the .pem (certificate chain) format for the next steps, so make sure that's selected before clicking the "Download" button.
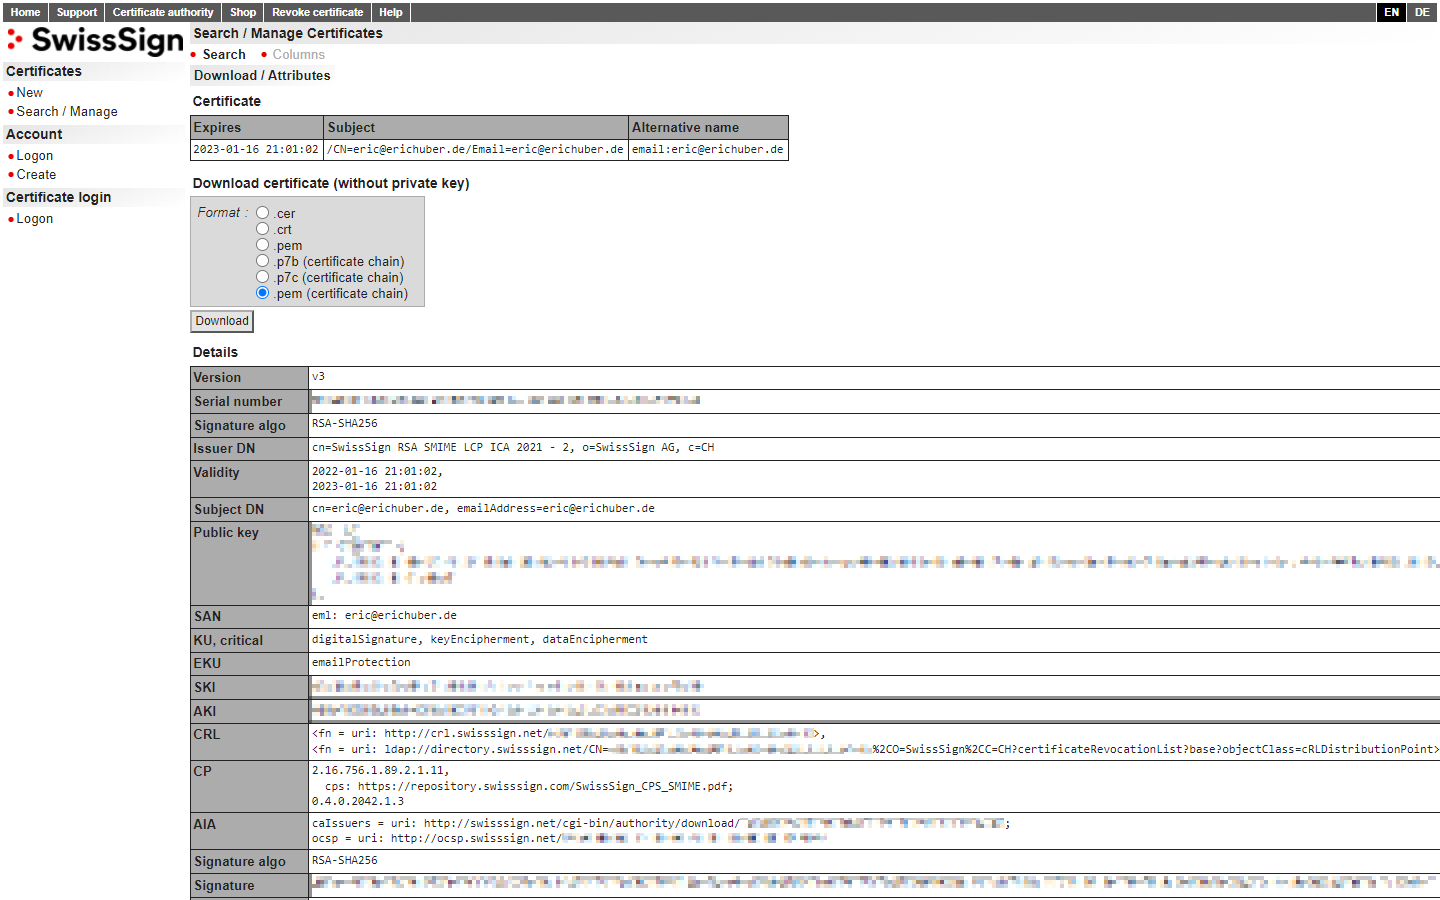
The downloaded file will have a name like [email protected] where [email protected] is your email address.
Upload your certificate in Gmail
Let's add your new S/MIME certificate to Gmail.
To get started, you'll need to convert your certificate to the PKCS#12 format. To do this, run the following command:
$ openssl pkcs12 -export -in [email protected] -inkey erichuber.de.key -out erichuber.de.p12Linux command to convert your PEM certificate chain into PKCS#12 format
You will be prompted to enter an "Export Password" which you will have to enter every time this PKCS#12 is imported into an email client such as Gmail, so make sure you write it down somewhere—preferably in a password manager of your choice.
Once you've entered a passphrase, a .p12 file will be saved in your current directory.
Next, open up or reload your Gmail tab, go to the settings tab, and select the Accounts tab.
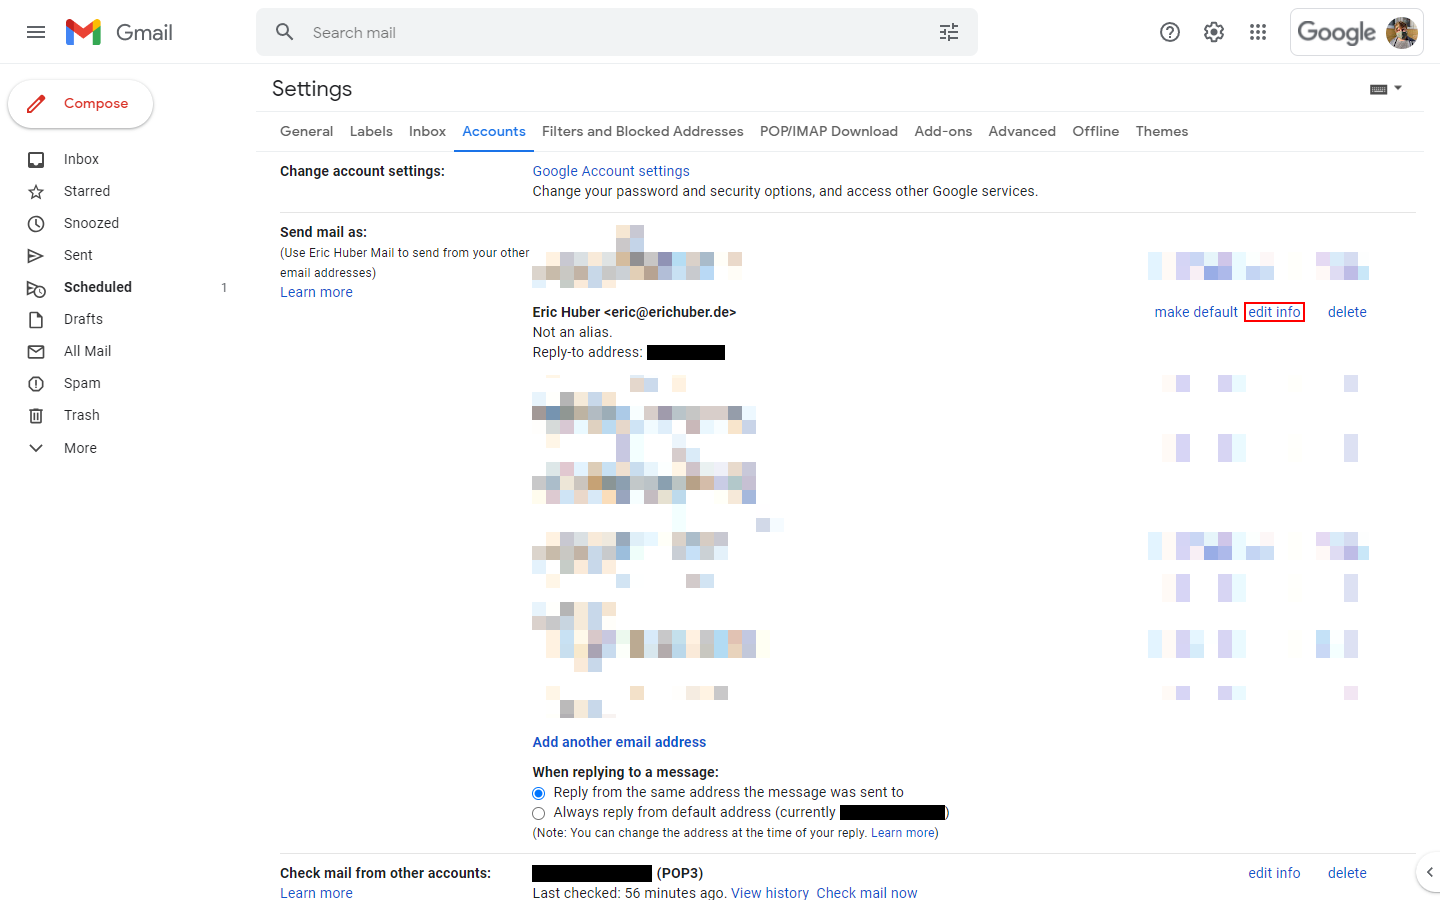
Find your email address in the "Send mail as" list, and click on "edit info" on the right-hand side. A yellow pop-up window will open.
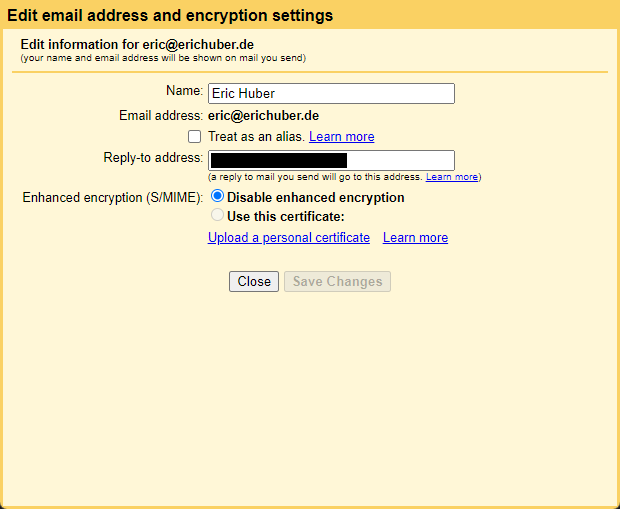
Click on the "Upload a personal certificate" link. You will be prompted with a file select dialogue. Select the .p12 file you generated earlier and confirm.
You'll be prompted to enter a passphrase, which is the "Export Password" you selected in the PKCS#12 conversion process earlier.
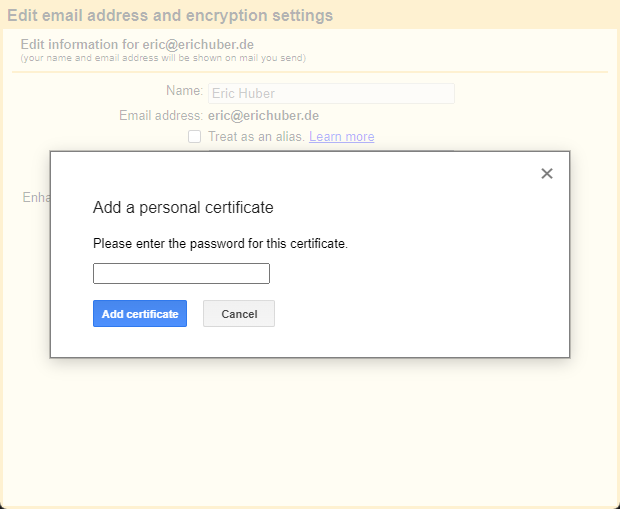
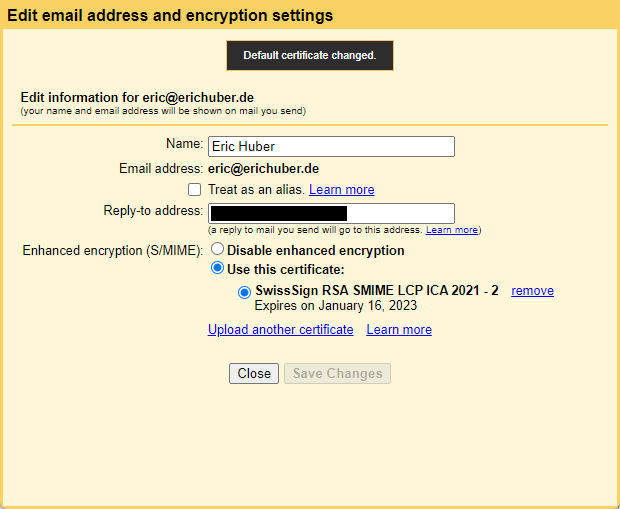
Finally, hit "Add certificate" to complete the process. Your certificate should show up in the list as expected. Make sure its radio button is selected and close the pop-up window.
Using hosted S/MIME in Gmail
Congratulations, your new S/MIME certificate is ready to be used! 🥳
Otherwise, your email will still use your provider's default encryption technology as if you didn't use S/MIME.
Test your digital signature in Gmail
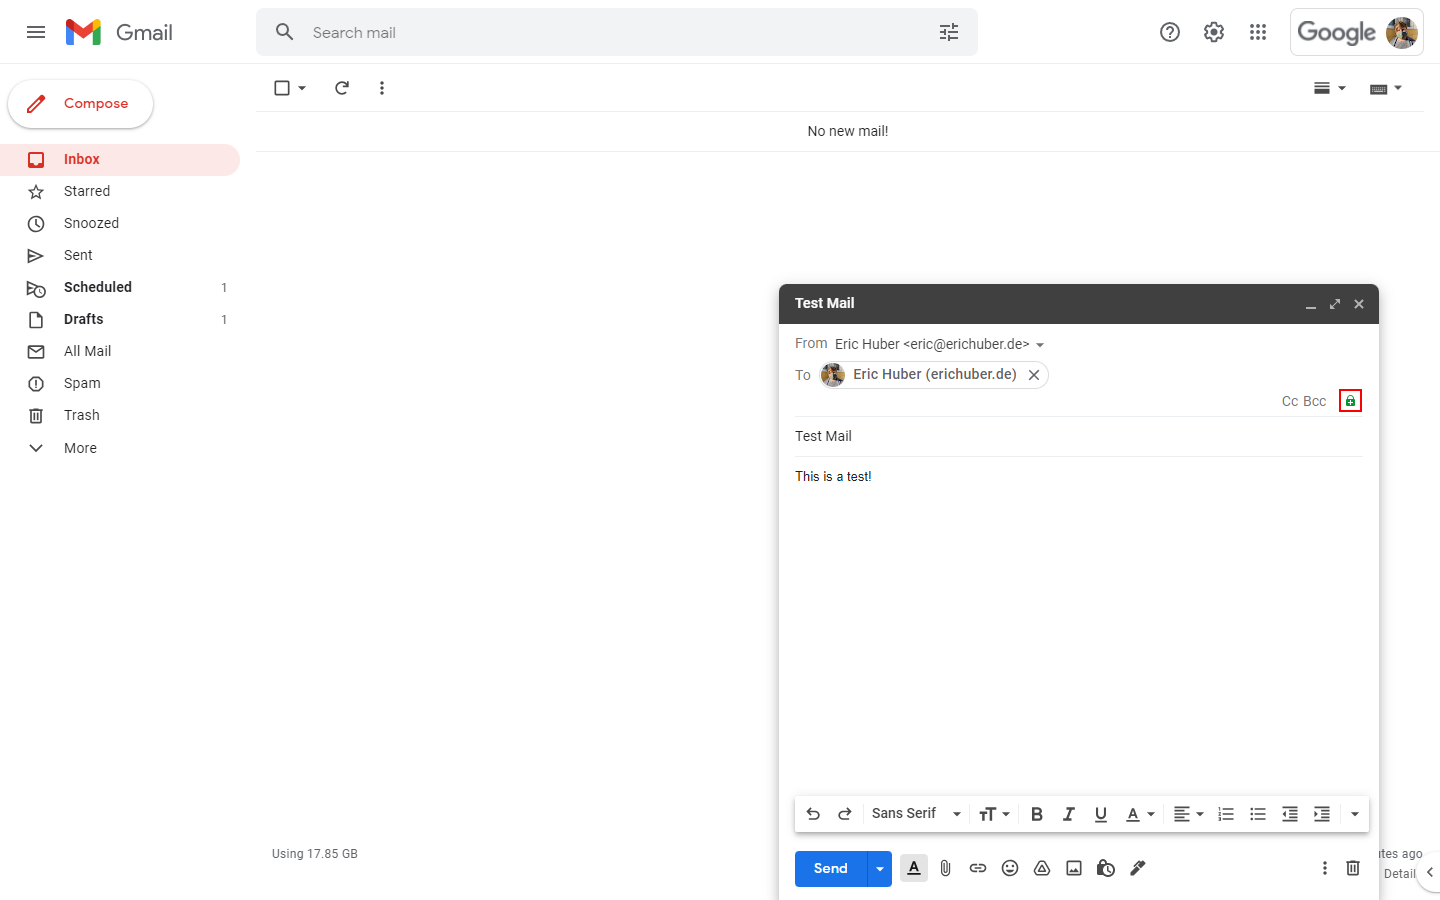
I've tested my own S/MIME certificate by sending a test email to my work email address:
And... there it is! The green check mark. Let's inspect the "Sender info" link once again:
Perfect! Looks like we have a match.
Send emails without the digital signature
Because of the way S/MIME works, every time you send an email, Gmail will inject an attachment that is usually hidden in modern email clients.
Unfortunately for us, sometimes that hidden S/MIME attachment is not actually hidden. For example, if you reply to a support ticket, help desk platforms like Zendesk will add your digital signature as an attachment to the support ticket itself, which might confuse customer support agents.
Google must have considered this to be an issue and put settings in place so that you can temporarily disable attaching your digital signature, if necessary.
To access these settings, start by drafting up an email. Add a recipient and you'll get a little lock icon on the right-hand side, next to the "Cc" and "Bcc" buttons:
Clicking the lock icon will present you with a pop-up summary of the message security methods used:
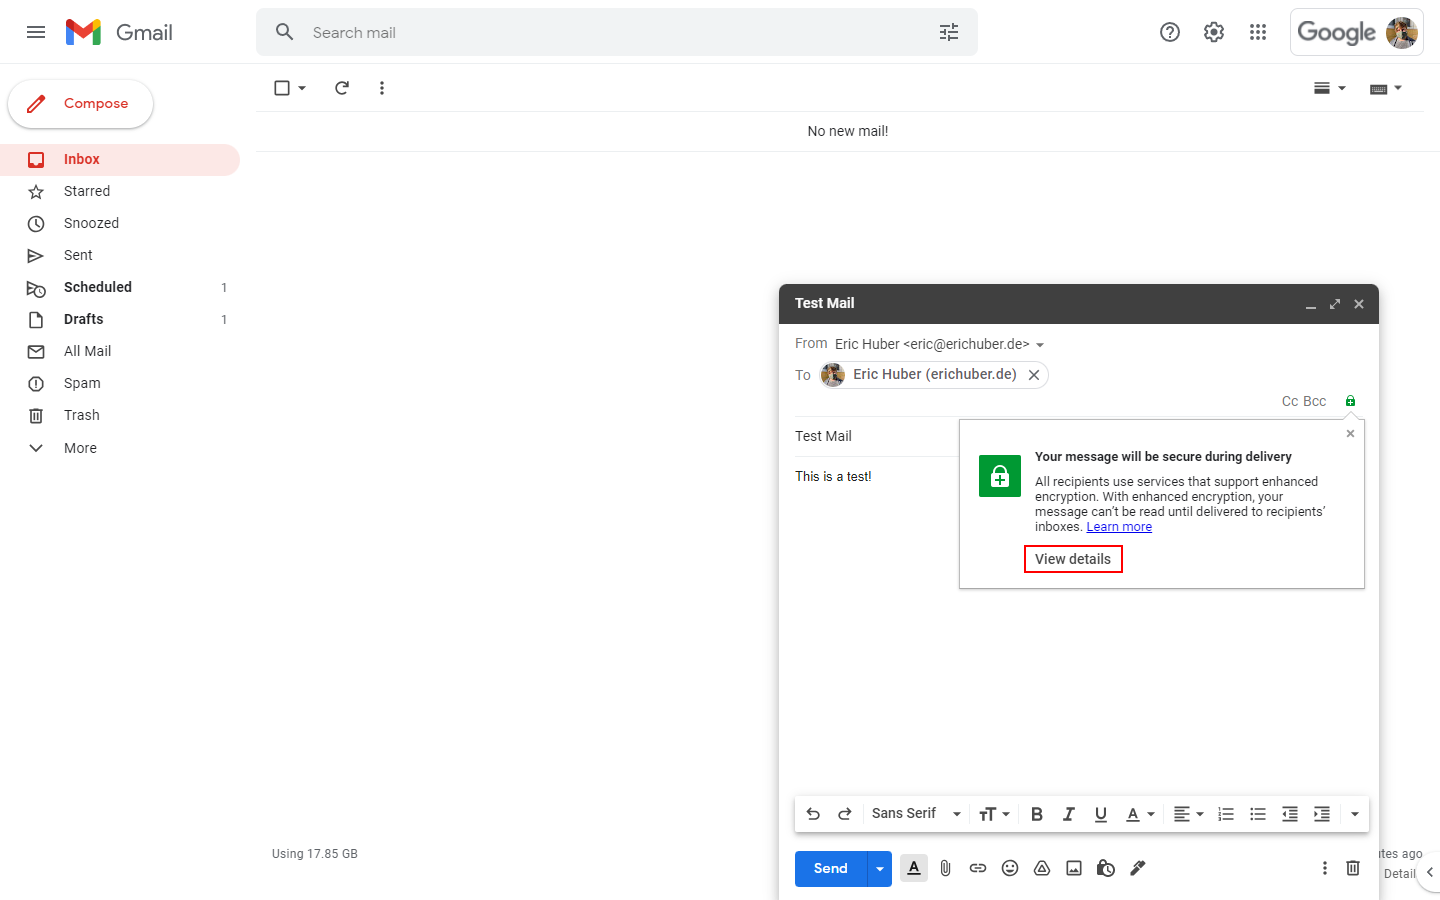
To change the message security settings, click "View details":
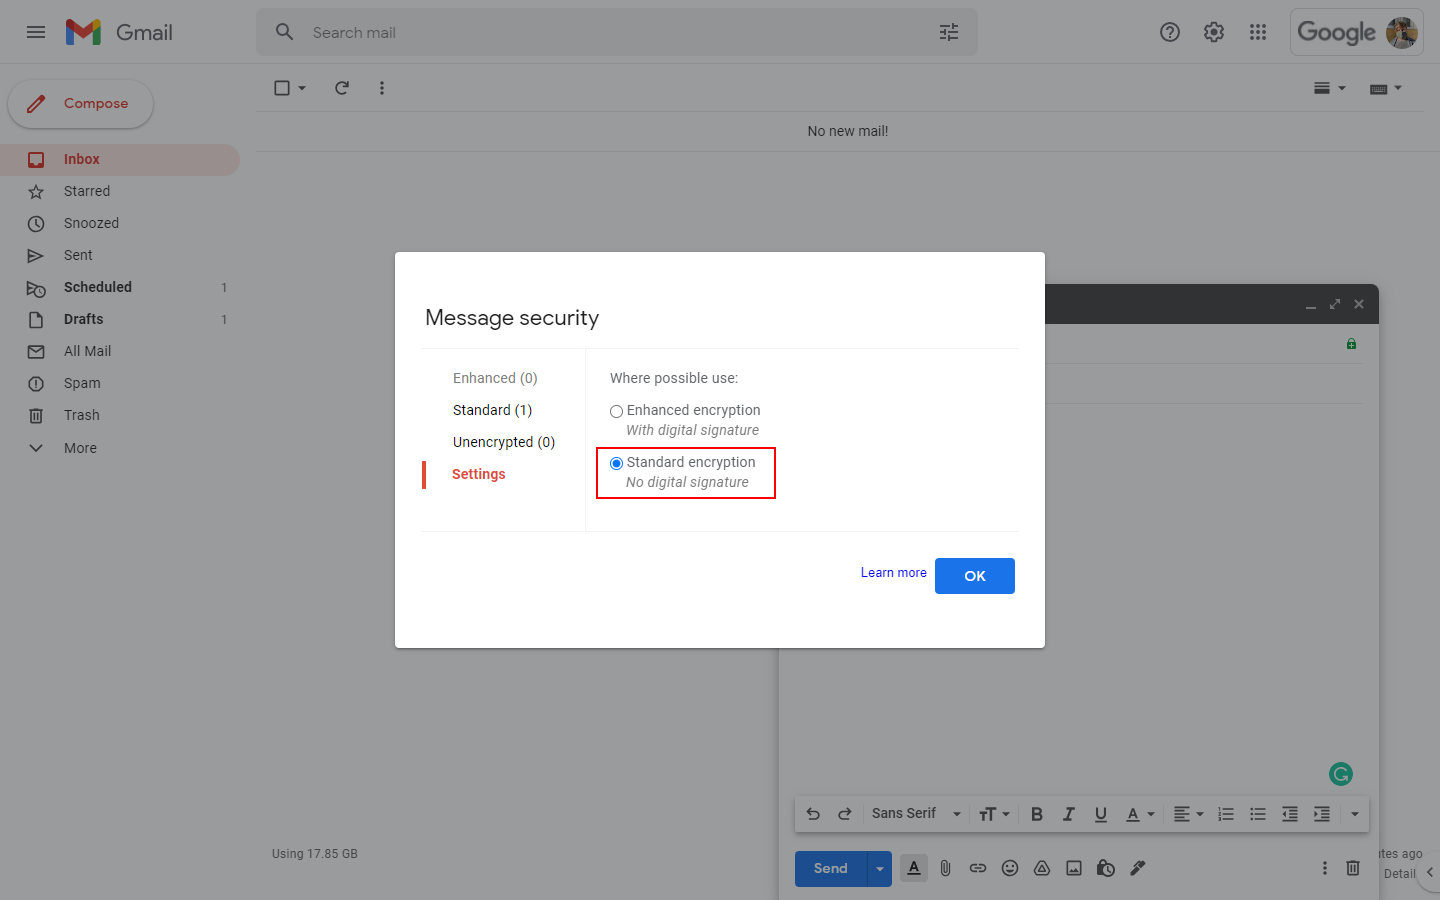
From here, all you have to do is click "Standard encryption" and you should be good to go. This will prevent Gmail from injecting your S/MIME certificate and force it to fall back to the default encryption method—most likely TLS.
You probably won't have to do this often, but it's handy to have it ready when necessary.
"This message could not be decrypted"
In very certain circumstances you might receive an encrypted email from a contact that Gmail "could not decrypt." The contents will be attached as a smime.p7m instead.
The displayed message gives some clues as to why that is:
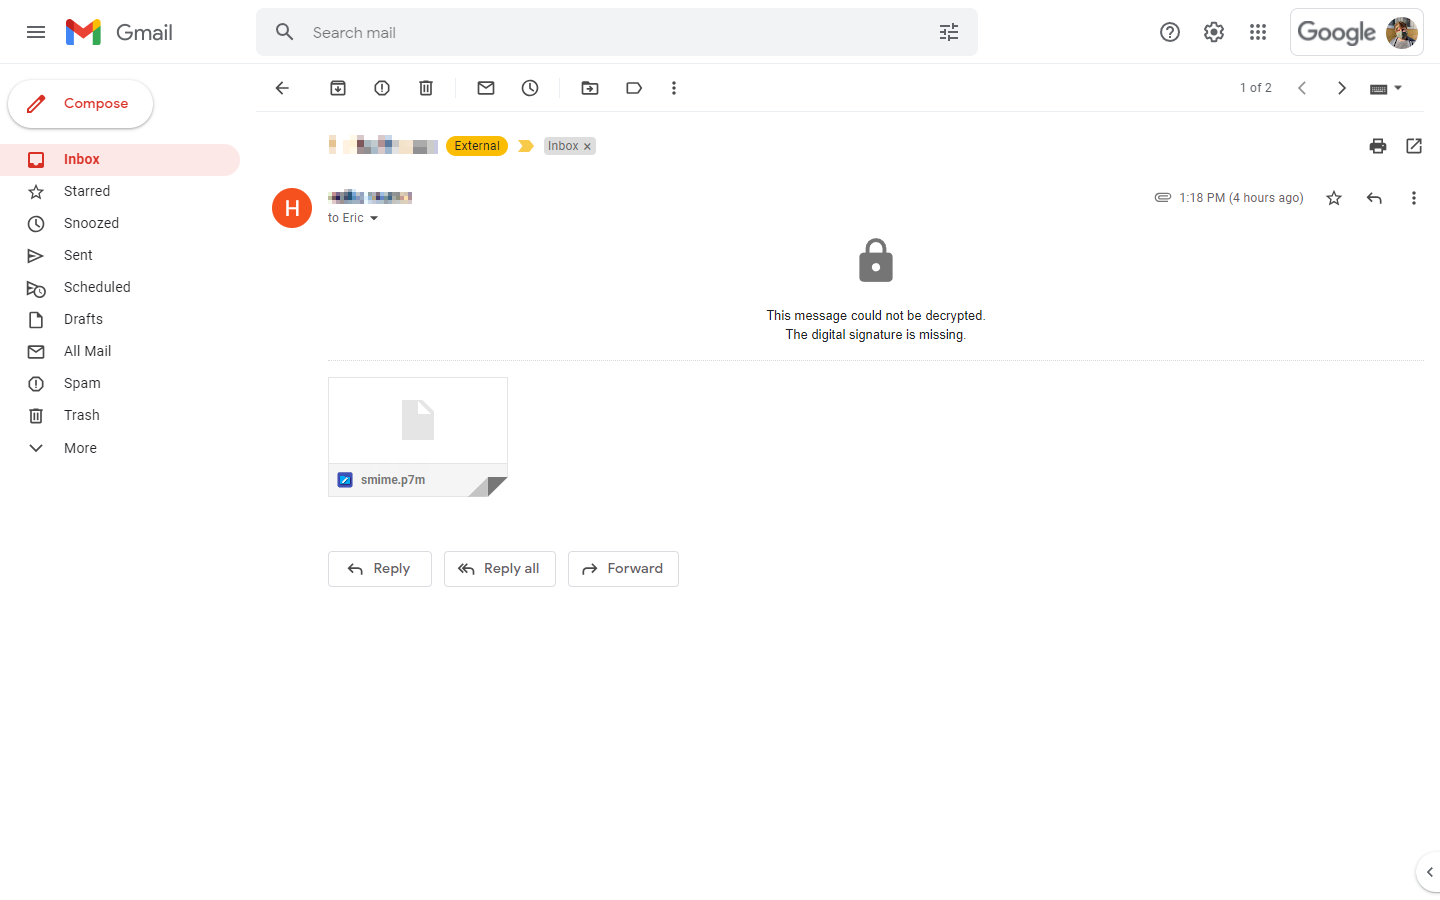
As you can tell from the very short and to-the-point error message, the sender did not supply their digital signature, which is why Gmail refuses to decrypt the email. It's not that it can't—Apple Mail does it without complaining—Gmail just doesn't want to.
I reached out to Google Workspace support in April of 2021 and was given this piece of information:
Hello Eric,
[...]
Be aware that you need to exchange keys with the email recipients to have Gmail encrypt/unencrypt the emails https://support.google.com/a/answer/6374496?#zippy=%2Cstep-have-users-exchange-keys
[...]
Check if the recipient email address is saved on your contacts at contacts.google.com
If the email address is there, remove the contact https://support.google.com/a/users/answer/9310241 section “3.3 Update contact details” before exchanging keys.
The latter paragraph might be the solution for you, but I discovered that one of my contacts simply did not attach their digital signature to any outgoing emails.
This doesn't stop us from viewing the email though! You can use this command to decrypt the smime.p7m attachment:
$ openssl cms -decrypt -in smime.p7m -inform der -inkey erichuber.de.keyLinux command to manually decrypt an email using your RSA key
Publishing your SMIMEA DNS records
It is recommended to publish your certificate's SMIMEA (Type 53) DNS records. This has two major benefits:
- It allows recipients to verify the validity of your signed email against the DNS record
- If someone wants to send you an encrypted email, they can use the SMIMEA DNS record to get your public key without needing your certificate file
Enable DNSSEC
The SMIMEA DNS record is only valid if your domain is DNSSEC enabled to verify that the TLSA record has not been altered illegally.
You may refer to this table to find out whether your TLD offers DNSSEC. If it does you might want to contact your provider for set-up instructions.
If your TLD or provider do not offer DNSSEC you will not be able to use the SMIMEA DNS record, but your certificates will still work just fine.
Obtain your name prefix
First things first, you're going to need the SMIMEA DNS record name. It consists of two parts:
- Your email prefix
- The
._smimecertsuffix
For example, if your email address is [email protected], your command would look like this:
$ echo -n eric | sha256sum | head -c 56Linux command for the name prefix
Note that only the string eric is used in the echo command as opposed to the entire email address. It's very important that you only include anything before the @ symbol, otherwise, your name prefix will be incorrect.
Your output should look similar to this:
6f9edcd3408cbda14a837e6a44fc5b7f64ccc9a2477c1498fcb13c77Output
But that's only half the story. You're going to need to add ._smimecert right after your hashed email prefix, like so:
6f9edcd3408cbda14a837e6a44fc5b7f64ccc9a2477c1498fcb13c77._smimecertHashed email prefix + ._smimecert = name prefix
And that's a wrap on your name prefix! ✨
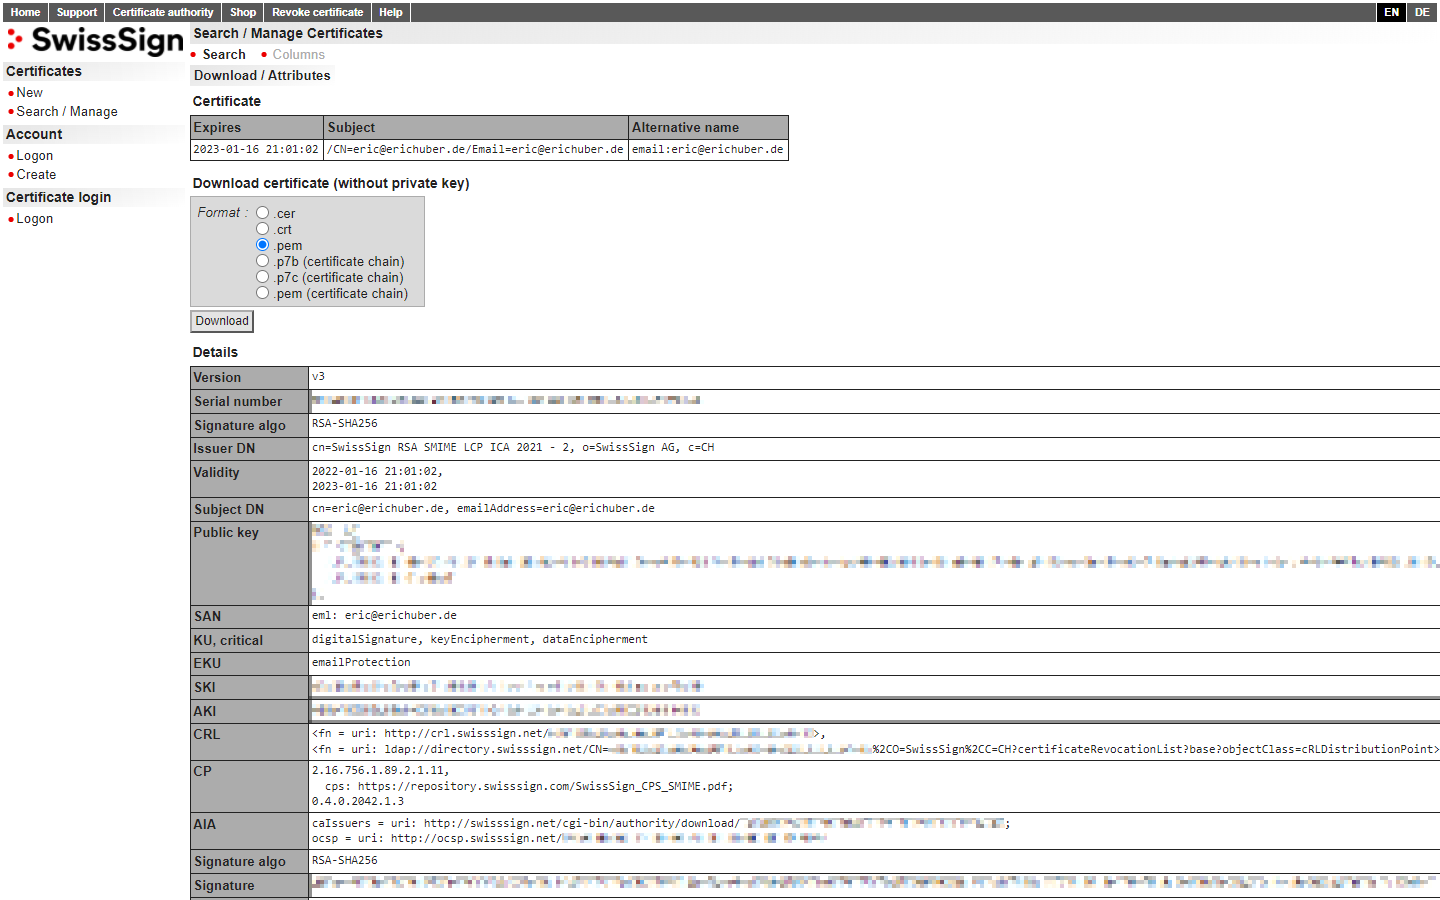
Download your PEM certificates
To use the next set of commands, you'll need your PEM certificates. Navigate back to the SwissSign download page and check the .pem radio button in the "Format" section:
Generate the hashes
Next up are the values.
There are two Selectors:
0forFull certificate1forSubjectPublicKeyInfo
And three Matching types:
0forNo hash used1forSHA-2562forSHA-512
Lastly, we will be using Usage 3 for Domain-issued certificate because it is the only one that applies to our use case.
Each of the Usages, Selectors, and Matching types plays a different role, so you're going to want to publish as many combinations as possible to ensure maximum compatibility.
To obtain the values needed for your SMIMEA DNS records, run these commands:
$ openssl x509 -in erichuber.de.pem -outform der | hexdump -e '" " /1 "%.2x"' -e '/65536 " "'Linux command for Usage 3, Selector 0, Matching type 0
$ openssl x509 -in erichuber.de.pem | openssl dgst -sha256Linux command for Usage 3, Selector 0, Matching type 1
$ openssl x509 -in erichuber.de.pem -pubkey | openssl pkey -pubin -outform der | openssl dgst -sha256Linux command for Usage 3, Selector 1, Matching type 1
Publish your records
And finally, you can publish your records via your provider, which, in my case, is Cloudflare:

There's a feature request on their community site you can upvote to hopefully have this changed in the future.
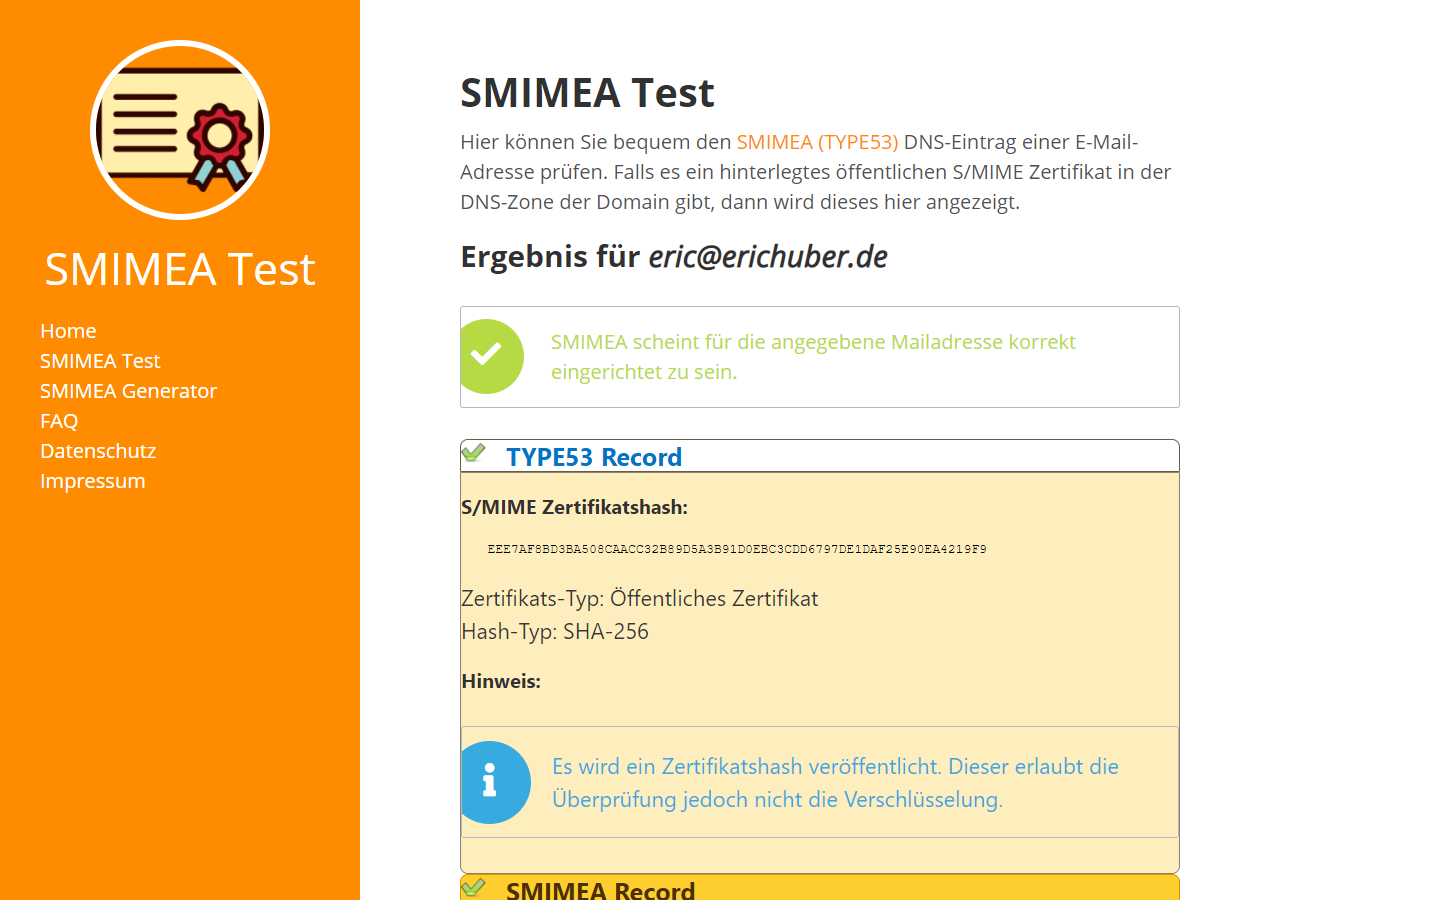
Test your records
I highly recommend Tobias Bauer's SMIMEA Test website to test your SMIMEA DNS records for validity:
The website is published in German but the results are color-coded, and you can use Google Translate to retrieve more information if necessary. The green checkmark usually means that your SMIMEA DNS records have been deployed properly:
Final thoughts
As you can tell from this elaborate walkthrough, the S/MIME set-up process can be very confusing and overwhelming for non-tech-savvy users who want to benefit from the extra layer of security and novelty of the check mark in email clients, which can make S/MIME rather undesirable to a large chunk of potential users. The added costs of Google Workspace Enterprise Plus and the periodic renewal of your S/MIME certificate can be a pain point as well.
In my opinion, S/MIME is a niche feature that's not going anywhere for now, after all, it is and will remain the standardized method for sending and receiving encrypted email. But in its current form, S/MIME's target audience will most likely not expand past high-profile companies and interested individuals.
Enjoy your brand new check mark!